
A standard inbound workflow starts with an incoming consignment. A consignment can be created with reference to a PO. Once the material reaches the warehouse, the next process is to verify the quantity and or quality and receive the material. Next would be to move the material to a storage location which is referred to as putaway. Additionally, we could verify in the system that the inventory shows up in the respective location.

At Hopstack, we follow a similar process flow with more flexibility. Now, let us take a deeper look at each step to understand the capabilities that hopstack provides for each of these steps.
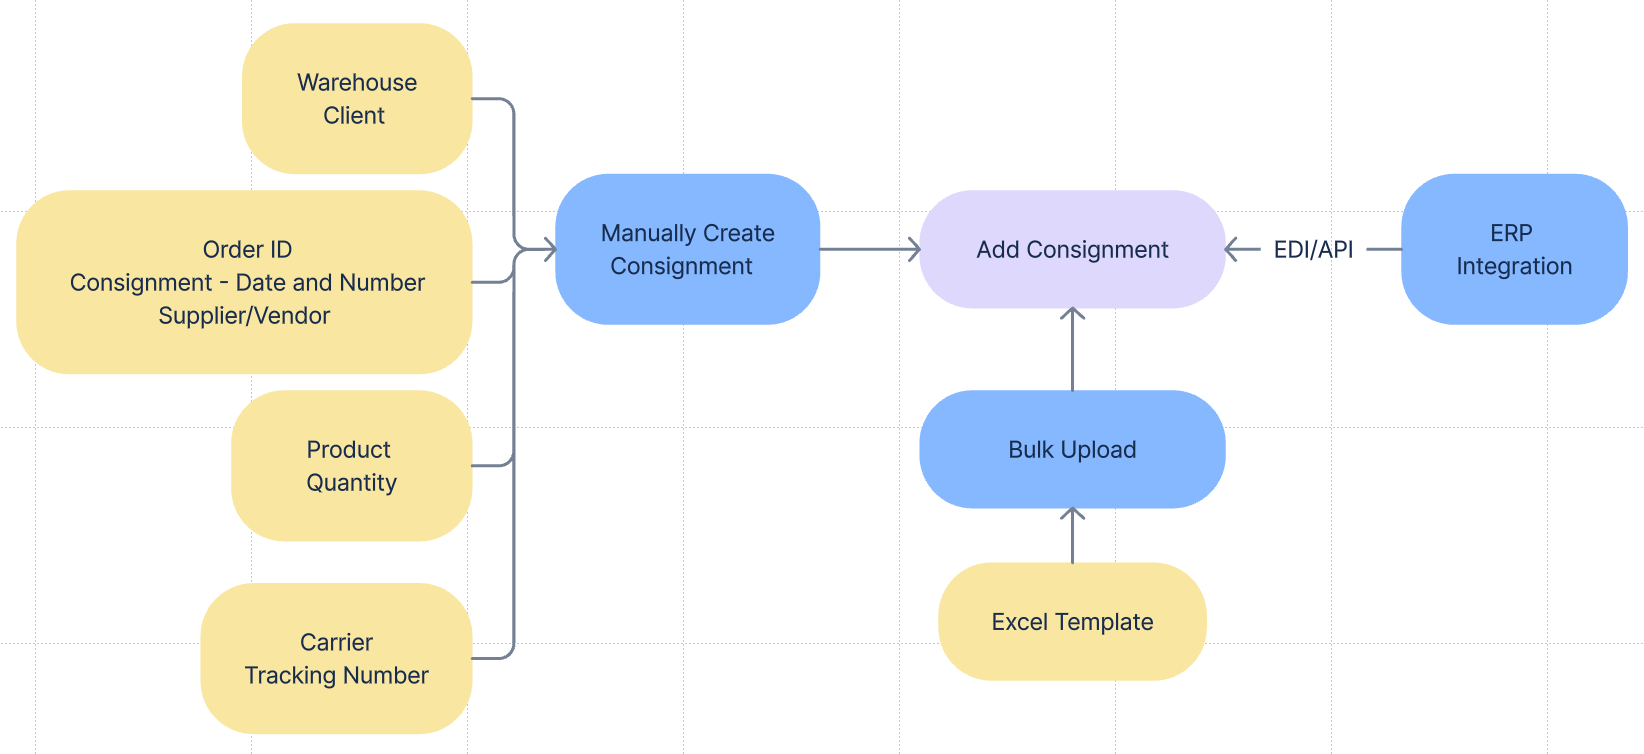
Add Consignment Consignments
Hopstack allows users to create two types of consignments.
a) Standard - This type is used when the intent is to store the received products in a storage location in the warehouse which will be used to fulfil an outbound order at a later point.
b) Dropship - This type is used for cross docking where the received products are used to fulfil an outbound order with little or no storage in between. (Understanding and Managing Drop-shipping a.k.a. Cross Docking - Use this link to learn more about drop ship)
Hopstacks provides users with the ability to add consignments through the below-mentioned channels.
-
Manually add consignments
while creating consignments users have the flexibility to (Define Bundles & Multi-Packs during consignment creation )
a) Searching Products by Channel
b) Use the enhanced FBA channel selection and import products
c) Define Bundles and Multi-packs -
Bulk Upload consignments - using the Excel template available on Hopstack
-
ERP Integration through API or EDI connections
Receiving Associate's Workflow - Receiving
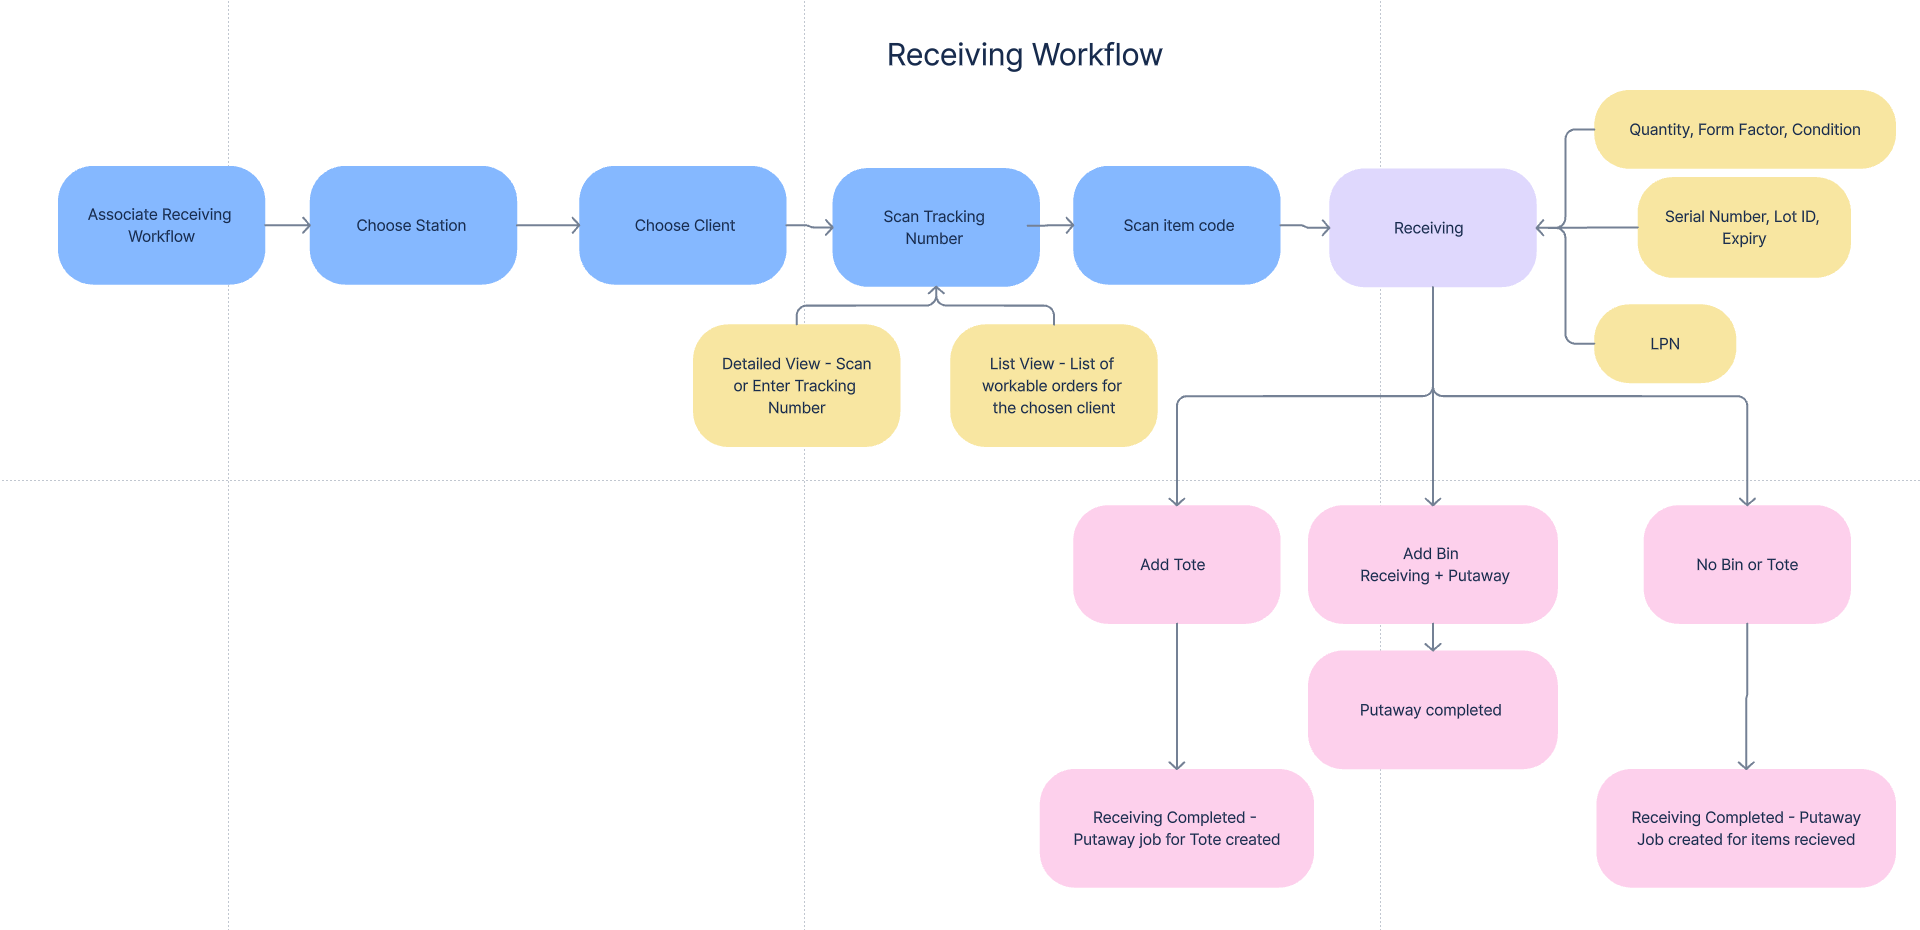
Receiving involves the following steps
-
Entering the receiving associate screen to initiate the receiving process - Accessing the Receiving Workflow Screen
-
Choosing a station for receiving - Choosing a Station for Receiving
-
Choosing the client for whom you are going to be performing receiving - Choosing a Client during Receiving
-
Scanning tracking number, Hopstack allows the user to scan the tracking number or choose the consignment that they would like to work on from the list view - Scan a Tracking Number
-
Scanning item code- Scanning an Item Code During Receiving After scanning the item the user enters the item details screen for receiving Item Details Screen - Performing Receiving. Hopstack provides the user the ability to add or generate LPN during the receiving process - Adding and Assigning LPNs During Receiving and adding serial numbers while receiving -Add Serial Number While Receiving.
Items details screen provides the users with an option to scan a tote while receiving which will trigger the put away for that tote. There is also an option to scan the Bin location while receiving which completes both receiving and putaway. After Submitting Item Details
Hopstack offers the flexibility to
-
Receive more than the requested quantity - Over-Receiving
-
Perform actions like Mark received, Mark closed, and receive current on consignments that are in unprocessed or in process status. Receive Current vs. Mark as Received vs. Mark as Closed
Users also have the ability to Action Menu for Consignments-
Download or view item list
-
Add notes
-
Edit or Delete - for consignments that are in unprocessed or draft status Editing Consignments
-
View Audit trail - Audit Trail for Consignments
-
Undo receiving - Undo Receiving
-
-
Mark the condition of goods while receiving. If damaged goods are received, users are able to capture images of damage and the reason for damage. Dealing with Damages During Receiving , Capturing Images of Damaged Items during the Receiving Workflow . There is also the ability to view the damaged items for every consignment - View Damaged Items During Consignment Receiving
Putaway Associate Workflow - Putaway
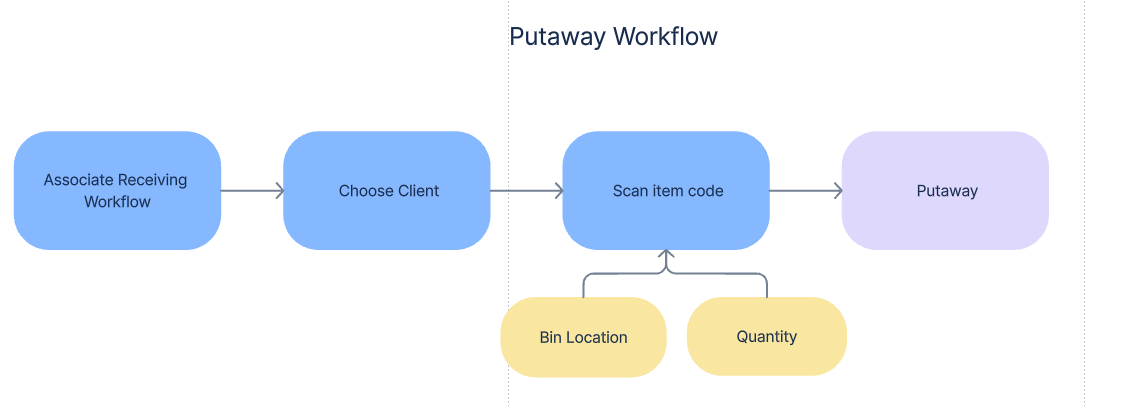
Putaway involves the following steps:
-
Entering the receiving associate screen to initiate the putaway process - Accessing the Putaway Workflow Screen
-
Choosing the client for whom you are going to be performing putaway - Choosing a Client during Putaway
-
Scanning item code, hopstack allows scanning of tote and LPN as well - Scanning an Item Code During Putaway
The item details screen is where the putaway occurs. The user should enter quantity and the storage location for putaway - The Item Details Screen - Putaway
Special features that hopstack provides for putaway are
-
Guided Putaway - Hopstack provides a suggested bin location based on algorithms that identify the optimal storage location based on multiple factors like replenishment rules, occupancy restrictions, existing locations and customer product adjacency. Guided Putaway Logic - Suggested Bin Location for Putaway
-
Tracking mechanism to track consignment status until putaway is completed and putaway using tracking number or consignment list view - Extended Granularity in Consignment Status Tracking