
Hopstack lets you choose how each location is used. You decide whether stock can be put away into it, and whether stock in it can be picked for new orders. Two settings on every location control this: Putaway allowed and Picking allowed.You set them in Storage Management, on a storage section or on any location in its hierarchy.
The Receiving Buffer, where received stock waits until it is put away, has its own Picking allowed setting. Turning it on lets orders use the receiving buffer stock.
Before you start: Putaway allowed and Picking allowed only take effect if location Validation is enabled for your account. These are the same settings that stop associates from using a location marked Unavailable. They are not enabled for every account. Please reach out to your implementation lead to confirm whether it is enabled or to have it enabled.
If Location Validation is disabled, you can still set and view both options, but they will not affect putaway, batching, or picking.
What each setting means
-
Putaway allowed: When this is ON, stock can be put away into the location. When it is OFF, Hopstack does not suggest the location for putaway. If an associate scans or enters the location as a putaway location, Hopstack shows an error.
-
Picking allowed: When this is ON, stock in the location can be allocated to new orders. When it is OFF, stock in the location is left out when orders are batched. Orders that were already allocated stock in the location are still picked from it.
-
Default values: Putaway allowed and Picking allowed settings are ON for every location until you change them. The Receiving Buffer is the exception. Its Picking allowed setting is OFF until you turn it ON, and Putaway allowed does not apply to receiving buffer.
Setting Putaway allowed and Picking allowed
You need edit access to Storage Management to change these settings. Without it, Configure Attributes is disabled. You can change both settings in View mode. You do not need to click Enter Edit Mode first.
On a storage section:
-
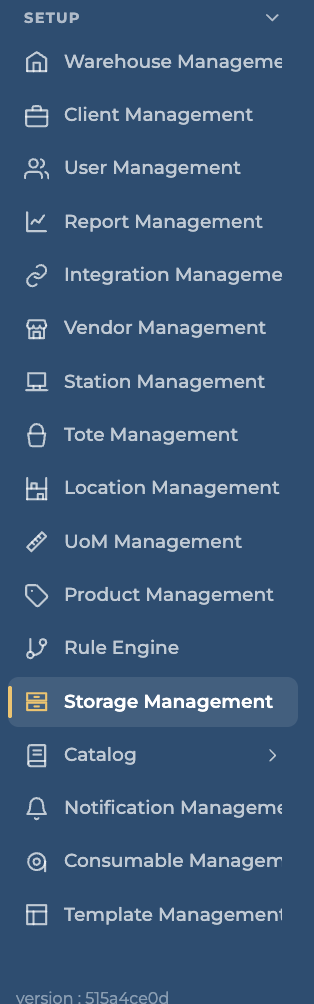
Navigate to Storage Management under Setup in the side menu.
-
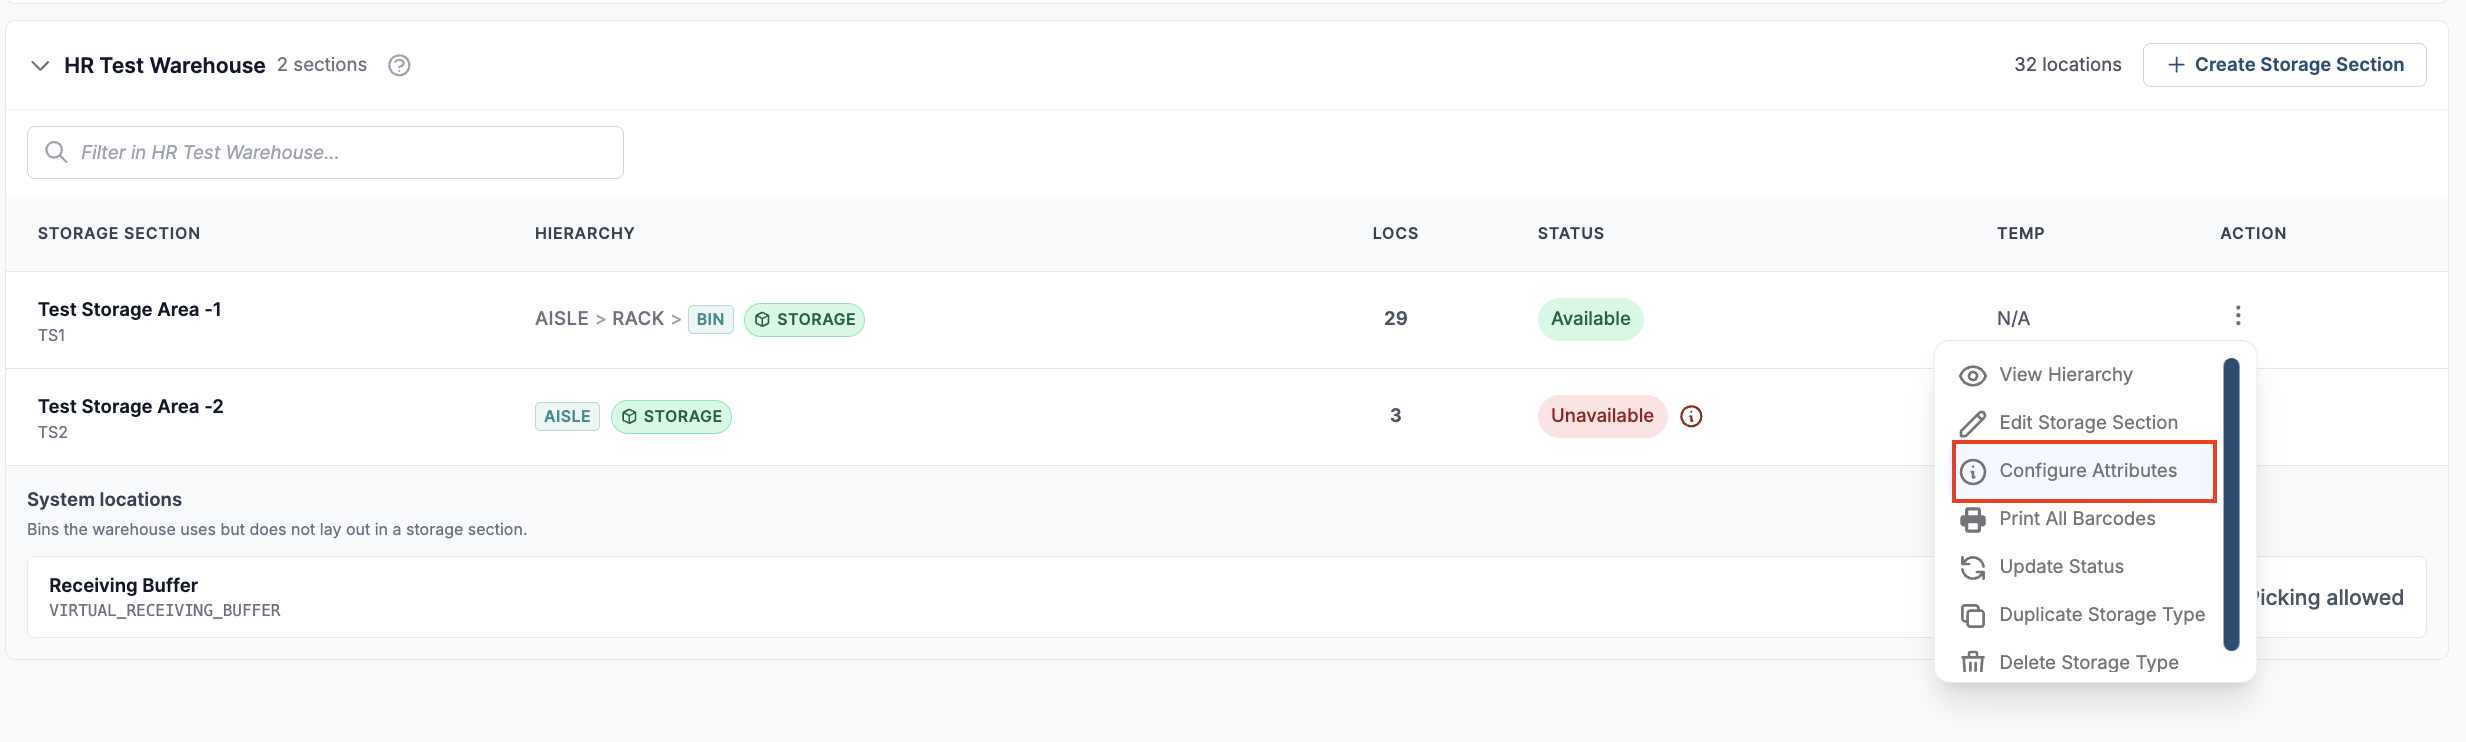
Expand the warehouse that holds the storage section.
-
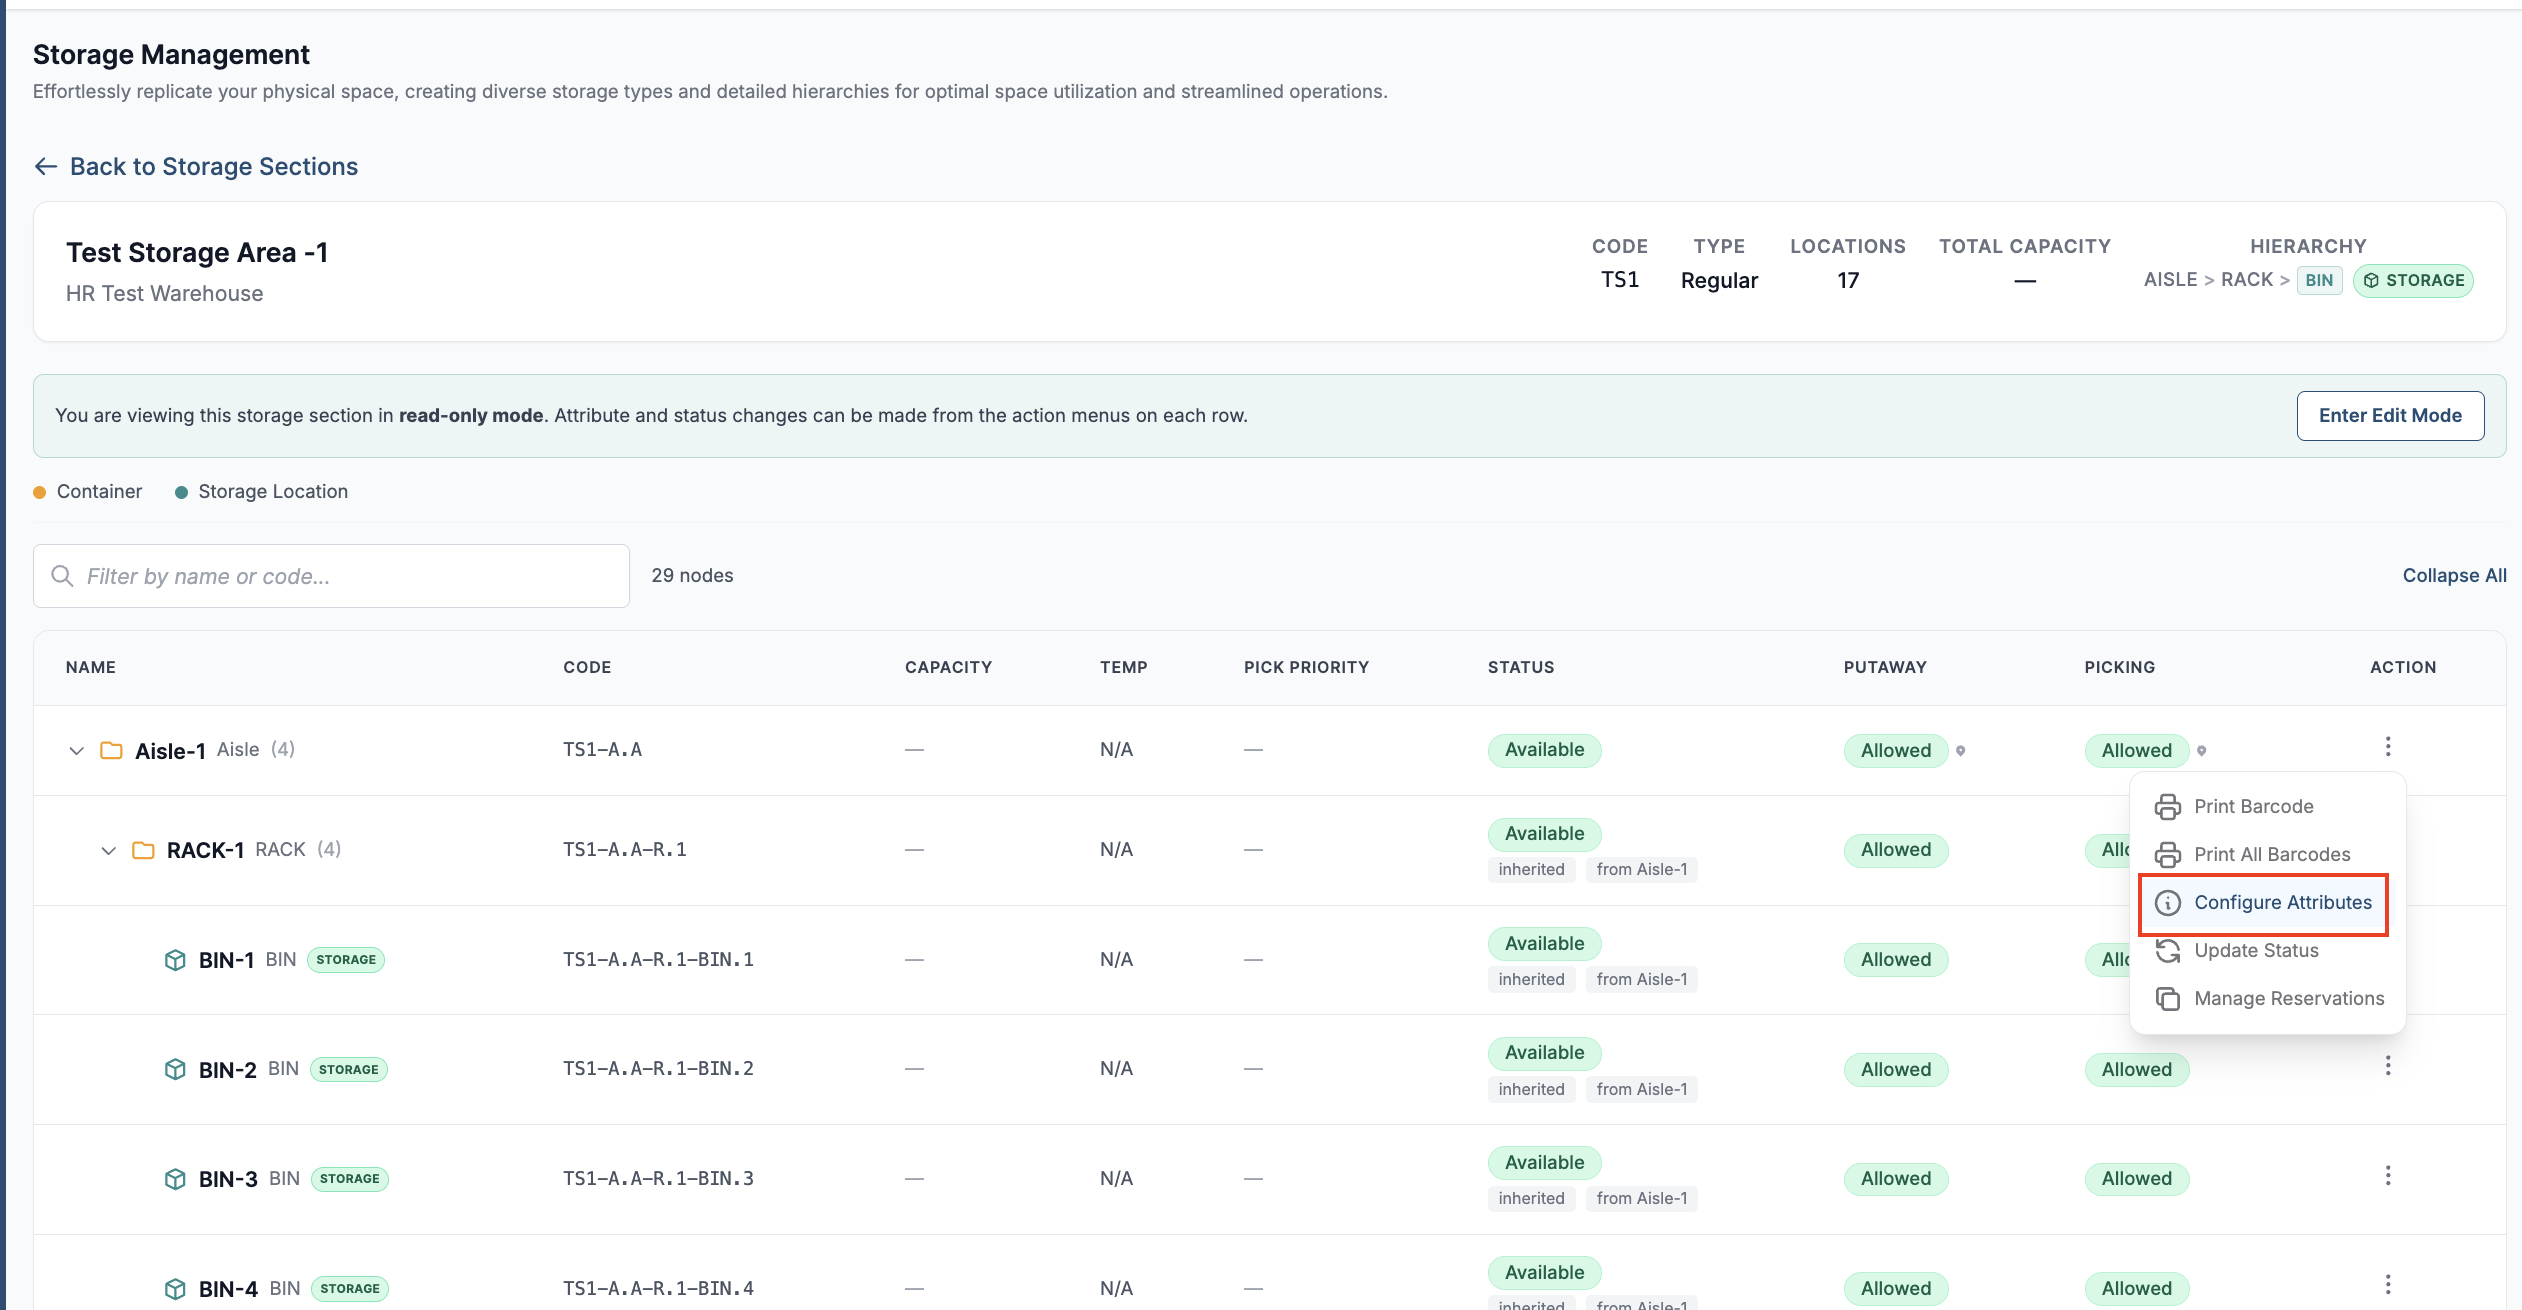
Under Actions for the storage section, click Configure Attributes.
-
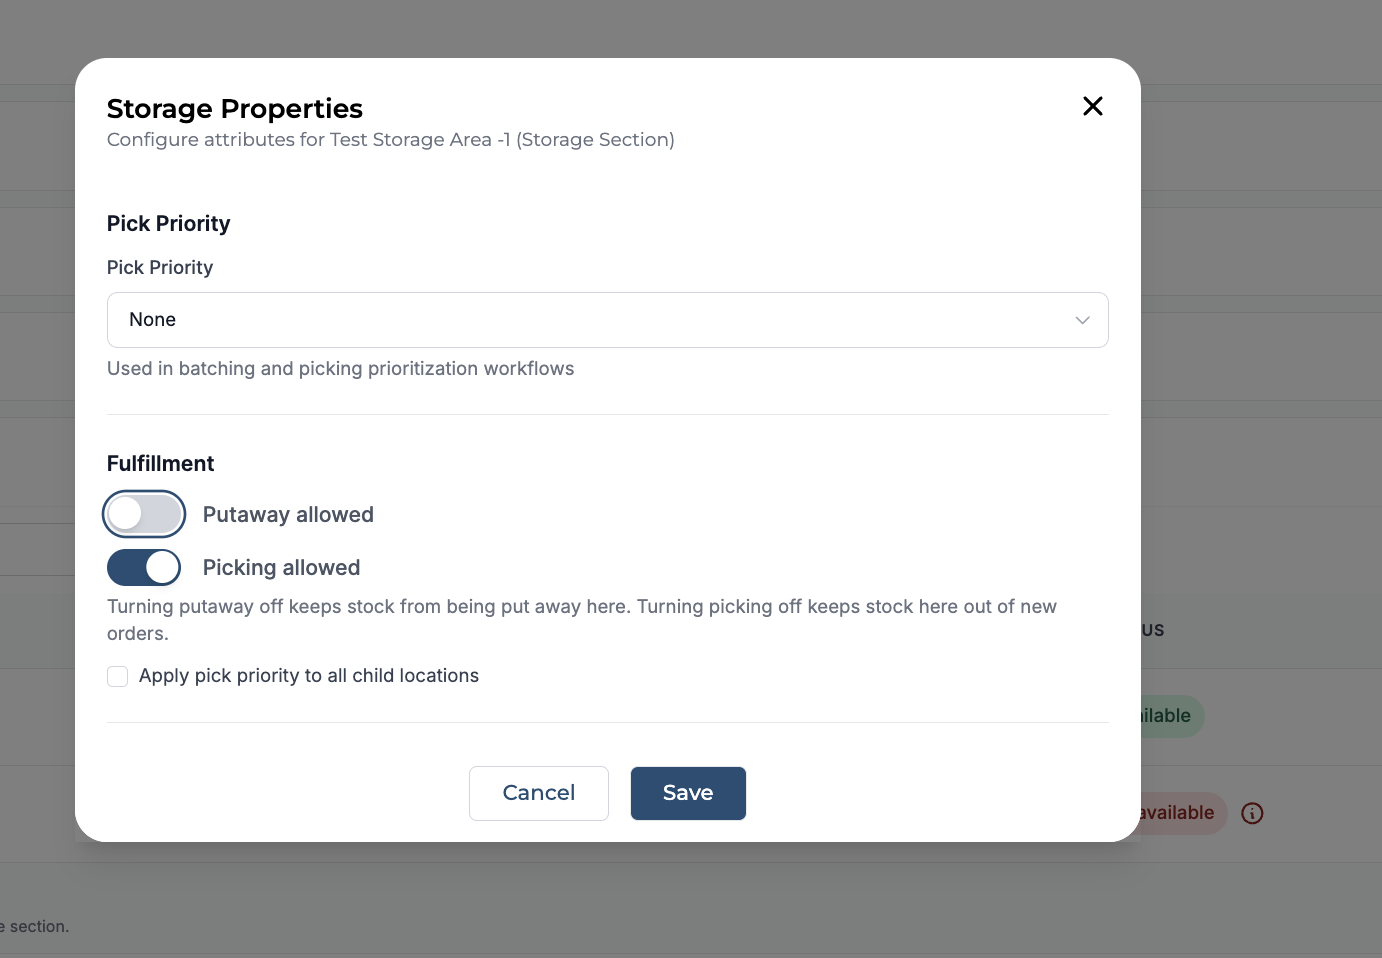
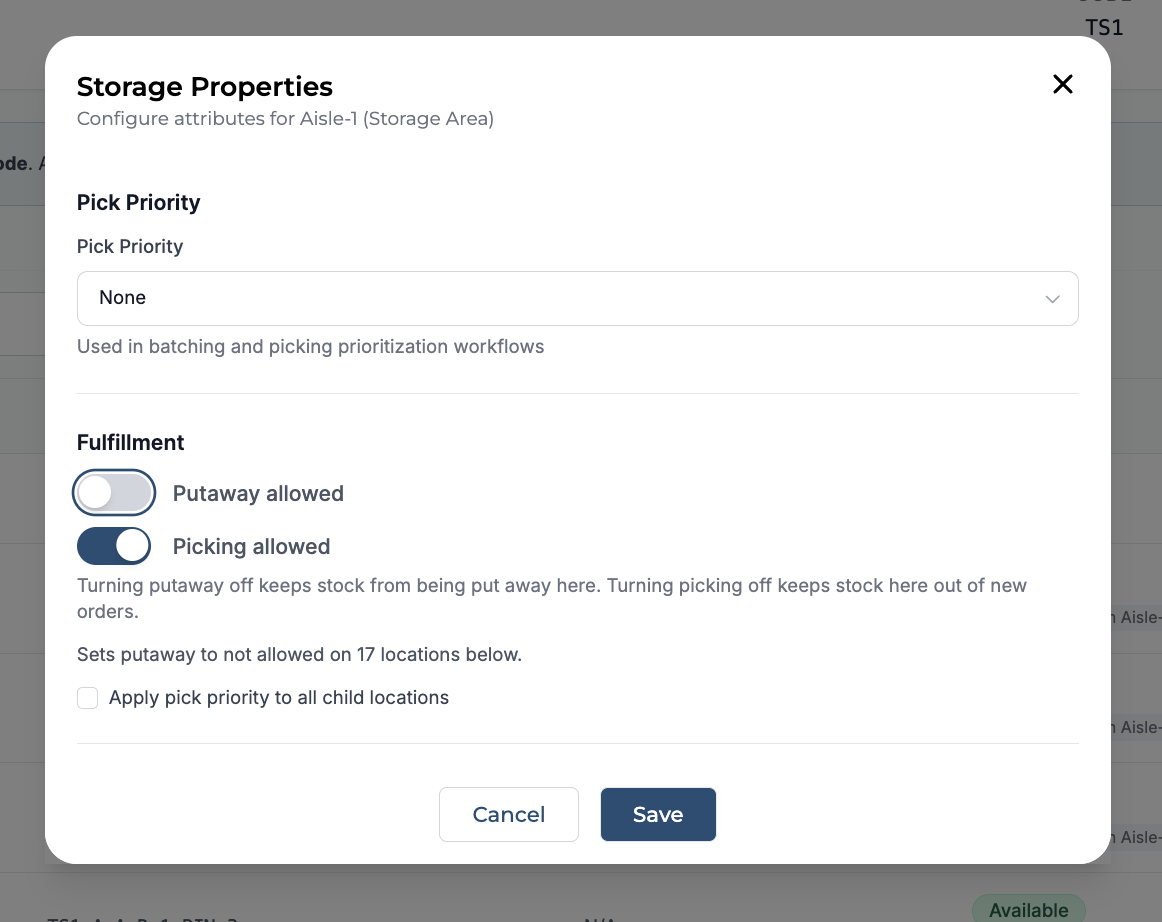
The Storage Properties window opens. Under Fulfillment, turn Putaway allowed and Picking allowed on or off.
-
Click Save.
On an aisle, rack, bin or other location:
-
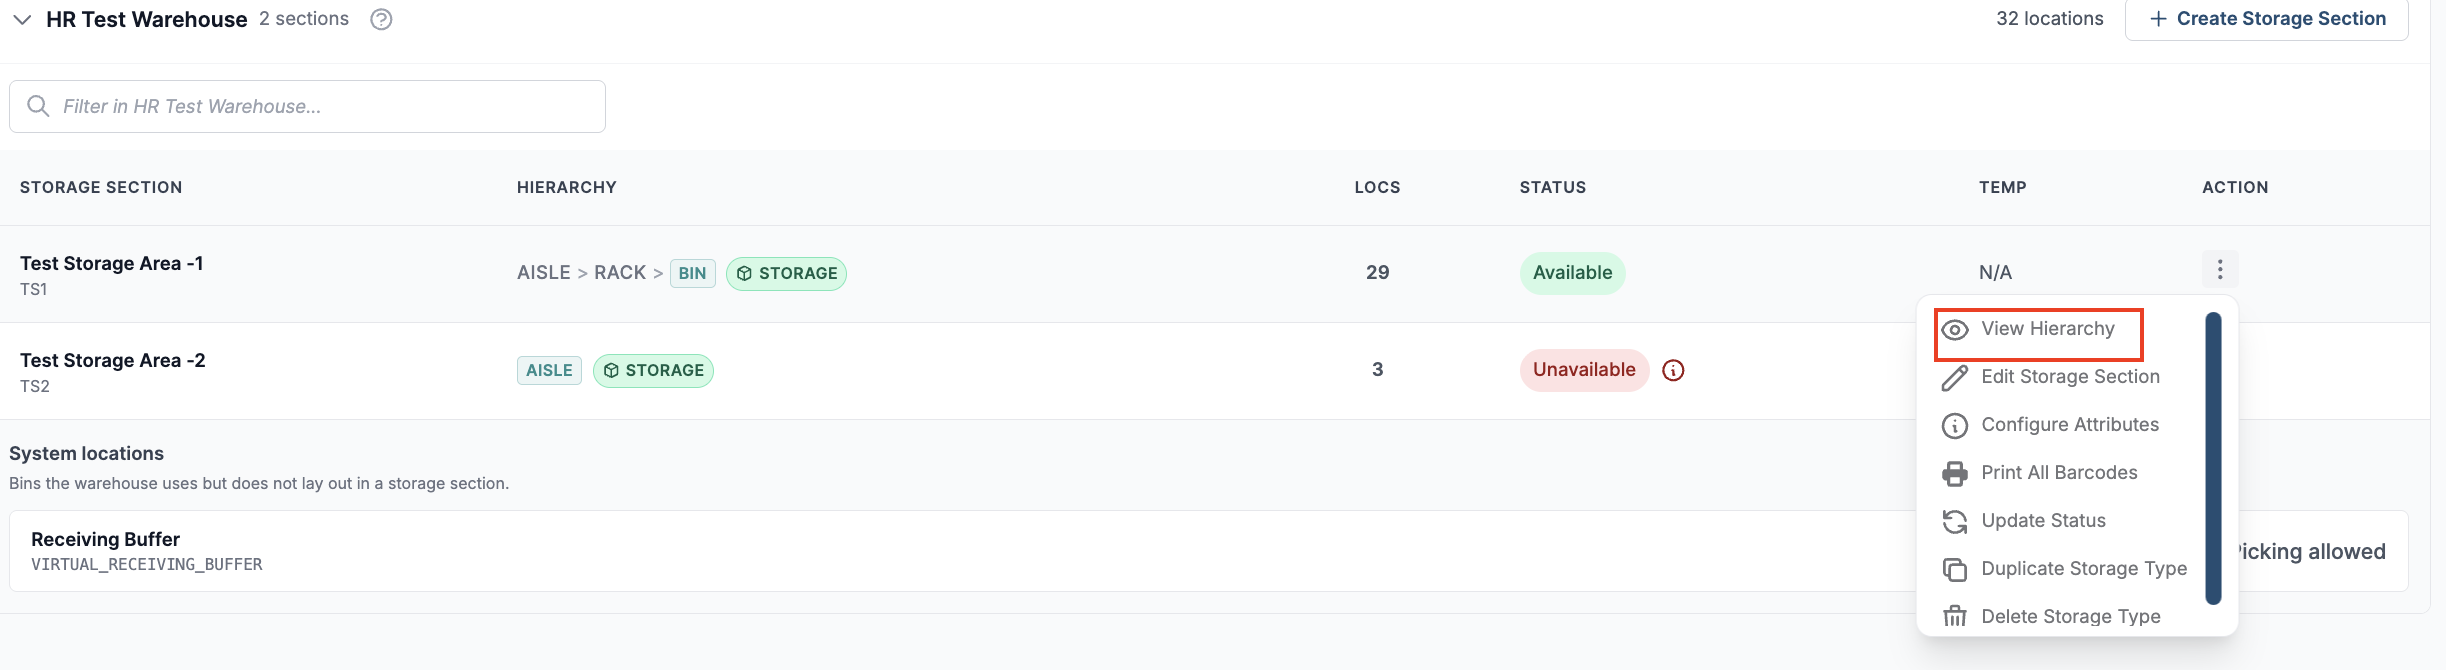
Under Actions for the storage section, click View Hierarchy.
-
Find the location in the hierarchy. Under Action on its row, click Configure Attributes.
-
Under Fulfillment in the Storage Properties window, turn Putaway allowed and Picking allowed on or off.
-
Click Save.
Reading the settings in the hierarchy:
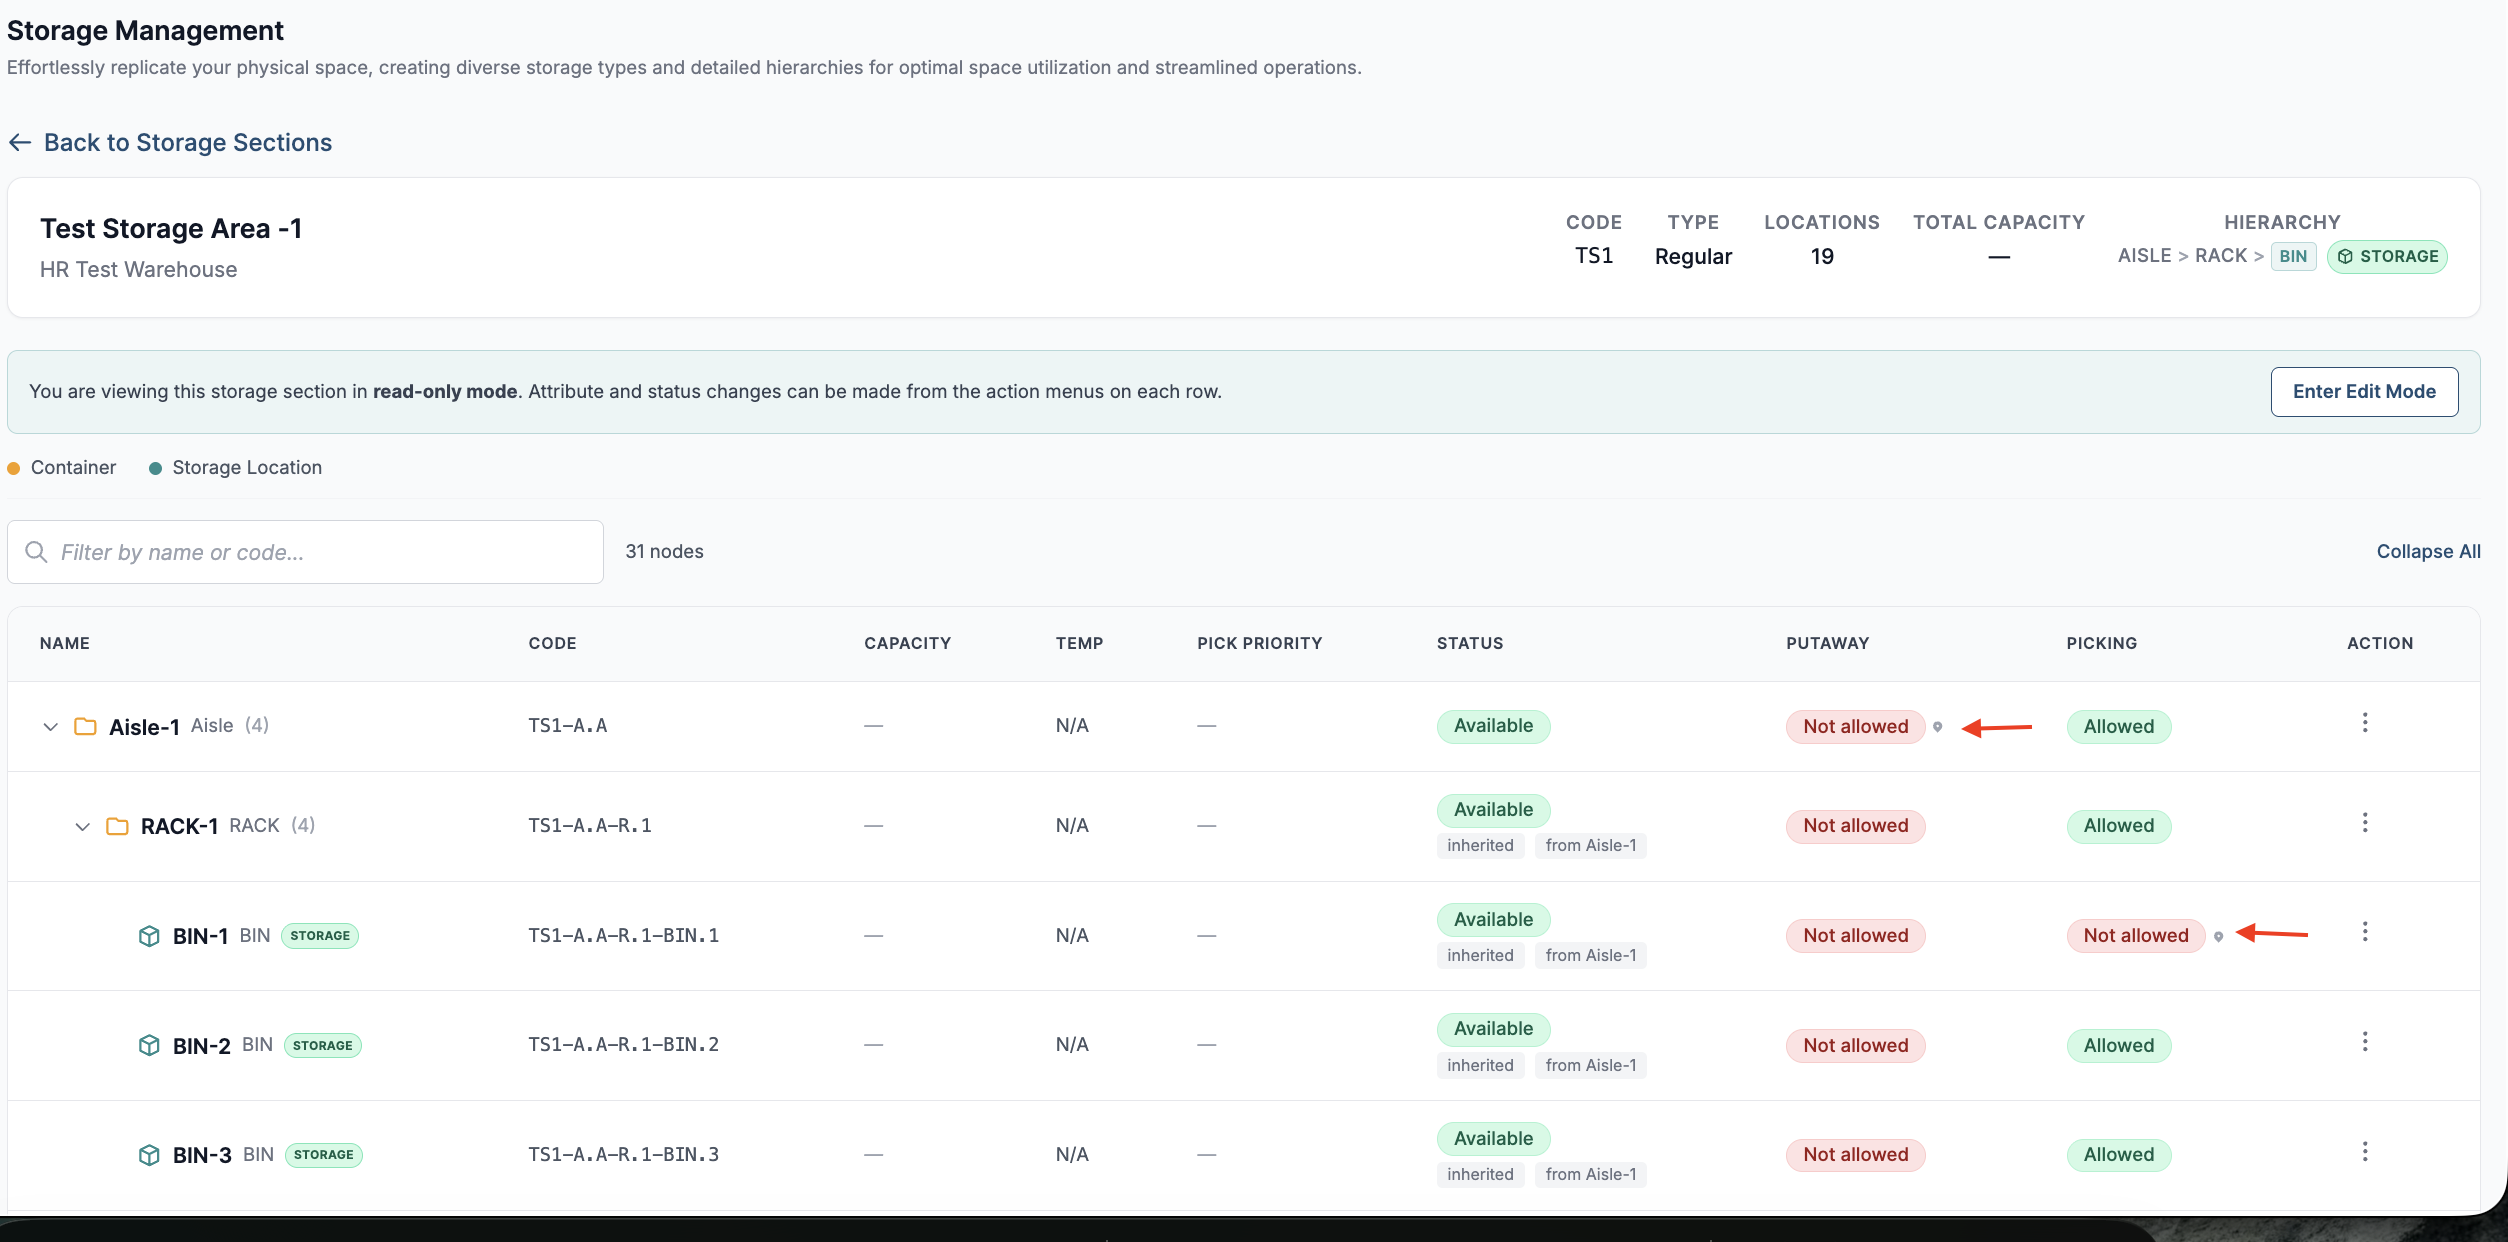
The hierarchy has a Putaway column and a Picking column. Each row shows Allowed or Not allowed. A small pin icon next to the value means the value was set on that location.
How the settings pass down to child locations
A change on a storage section, or on a location with locations below it, is passed down to every location below. It replaces any value set on those locations individually.
-
When you change a setting on a storage section, the new value is applied to every location in that section.
-
Some locations have locations below them, such as an aisle or a rack. When you change a setting on one of these, the new value is applied to every location below it.
-
When you change a setting on a location with nothing below it, only that location changes.
-
Changing a setting on a location never changes the location above it.
-
Only the setting you changed is passed down. For example, if you turn off Putaway allowed on an aisle, the Picking allowed values below the aisle stay as they were.
-
The value passed down replaces any value that was set on a location below. Before you click Save, the Storage Properties window shows how many locations will be updated. It also lists the locations whose own value will be replaced. For example: "Sets putaway to not allowed on 24 locations below. 2 were set individually and will be overridden: A1-R2-B3, A1-R2-B4."
-
If every location below already has a set value, the window shows "All N locations below already have this value."
-
A location you add under an existing location starts with that parent location's Putaway allowed and Picking allowed values.
Note: The Apply pick priority to all child locations checkbox in the same window applies to Pick Priority only. Putaway allowed and Picking allowed are always passed down from a storage section or from a location with locations below it.
Giving one location a different value:
-
Set the value you want for most locations on the storage section, aisle or rack first.
-
Then click Configure Attributes on the single location and set its own value.
-
The location shows the pin icon. If you later change the same setting on a location or section above it, the new value replaces this location's own value.
Impact of Putaway allowed on workflows
-
Suggested Putaway: A location with Putaway allowed off is never suggested as a putaway location.
-
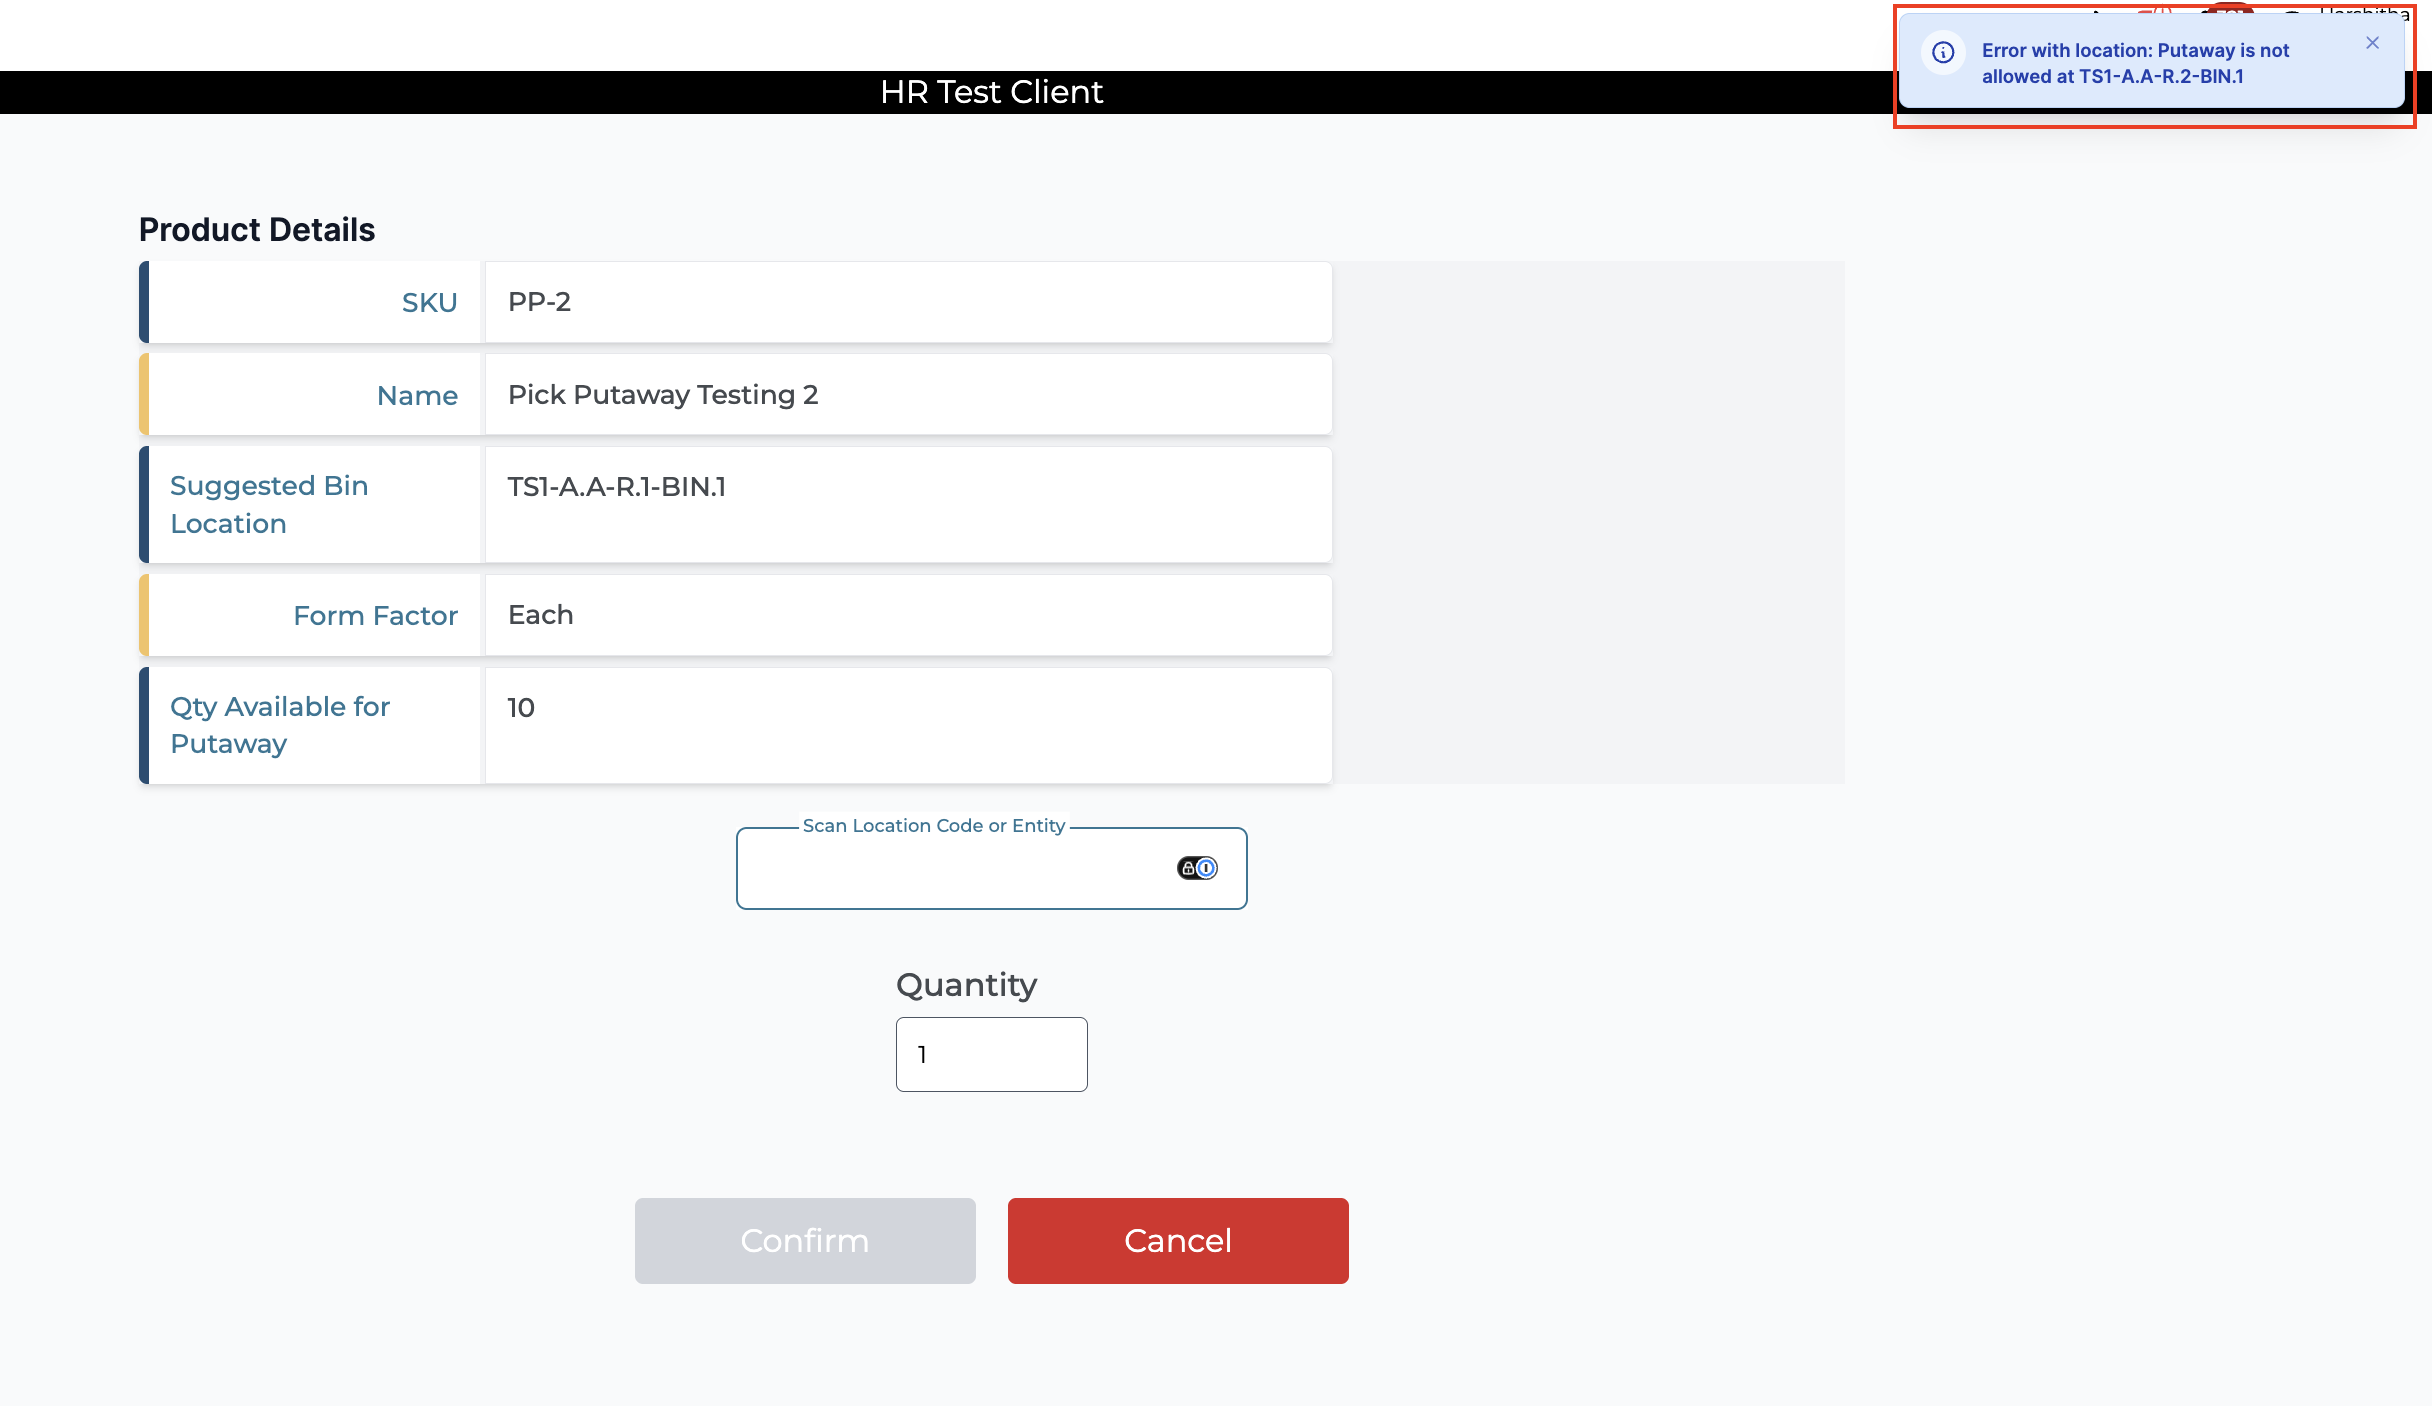
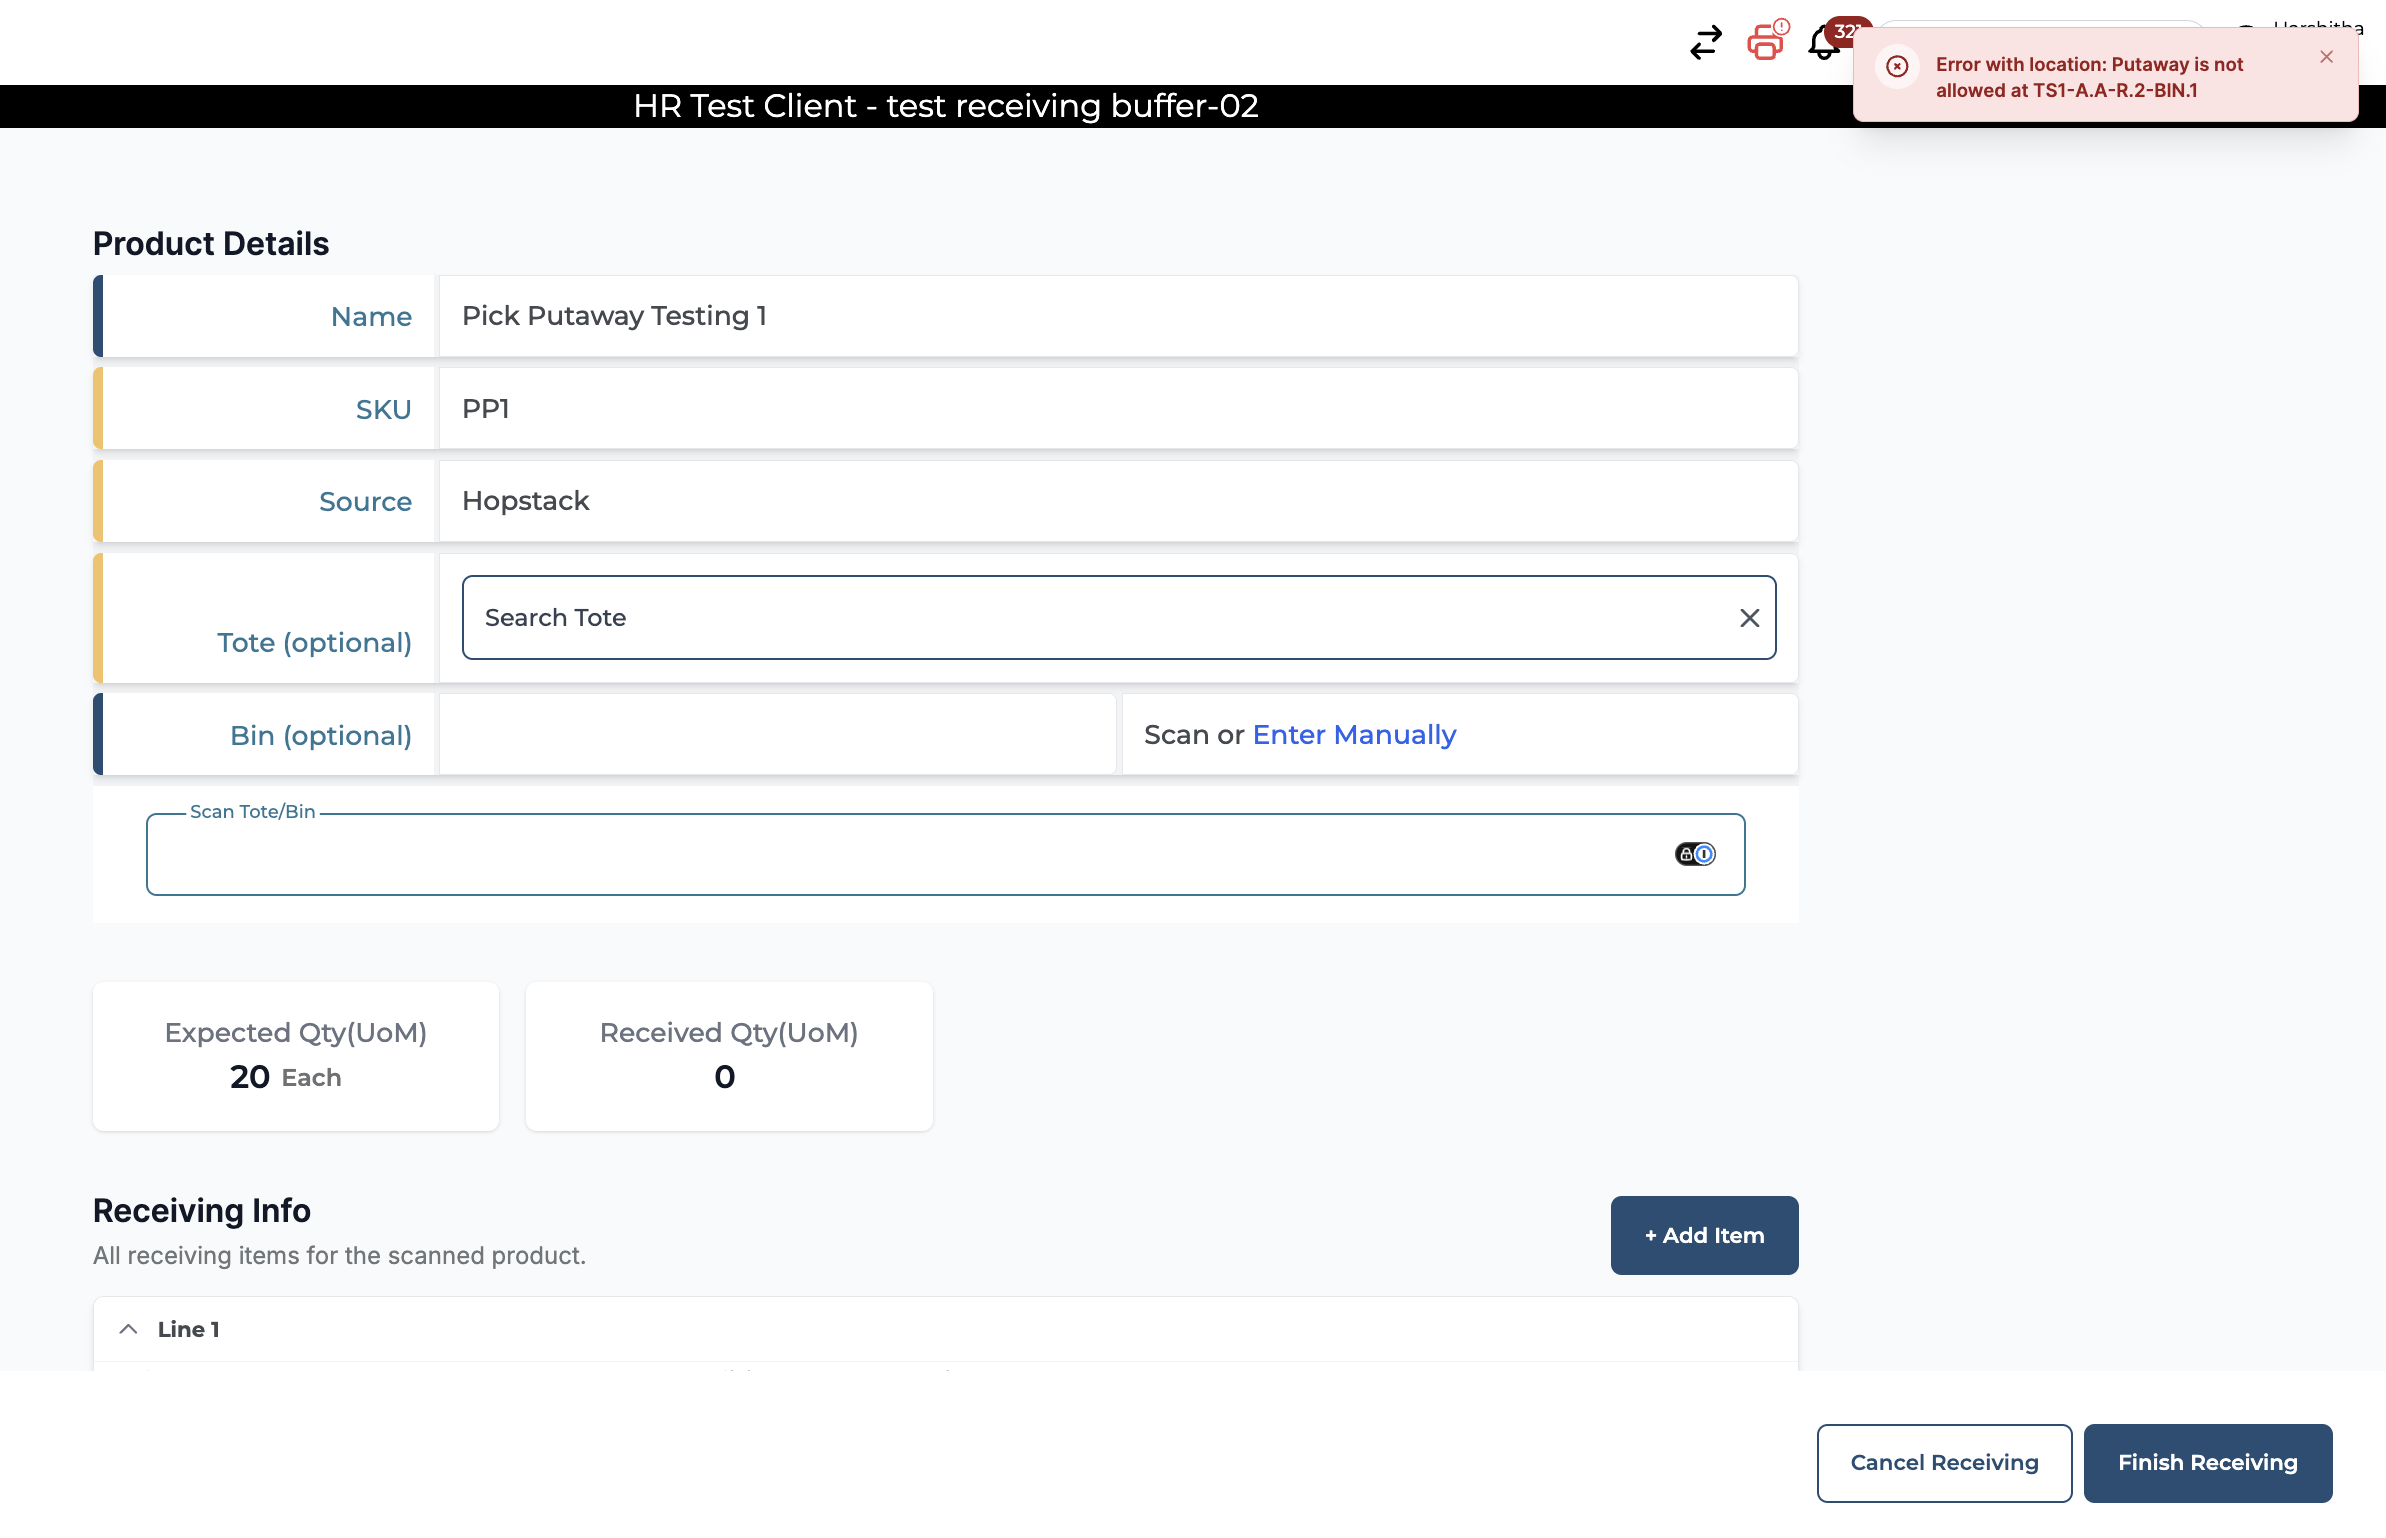
Putaway Workflow: If an associate scans a location with Putaway allowed off as the putaway bin location, Hopstack shows an error. For example: "Error with location: Putaway is not allowed at “TS1-A.A-R.2-BIN.1".
-
Receiving Workflow: If an associate enters or scans a location with Putaway allowed off as the putaway location while receiving, Hopstack shows the same error.
Impact of Picking allowed on workflows
-
Order Batching: Stock in a location with Picking allowed off does not count toward the quantity available to an order. The order is not allocated stock from that location. This works the same way as stock in an Unavailable location.
-
Picking Workflow: Turning off Picking allowed does not affect orders that were already allocated stock from that the location. Those orders are still picked from it. For orders batched after the setting is turned off, Hopstack will not allocate stock from the location, so pickers will not be directed there for those orders.
Note: Putaway allowed and Picking allowed do not affect Bin-to-Bin Transfers or SKU-Bin Management.
Picking from the Receiving Buffer
Stock that has been received but not yet put away waits in the Receiving Buffer. By default, orders cannot be allocated stock from the Receiving Buffer. Each warehouse's Receiving Buffer has its own Picking allowed setting. Turn it on to let orders use this stock.
Turning on Picking allowed for the Receiving Buffer:
-
Navigate to Storage Management under Setup.
-
Expand the warehouse.
-
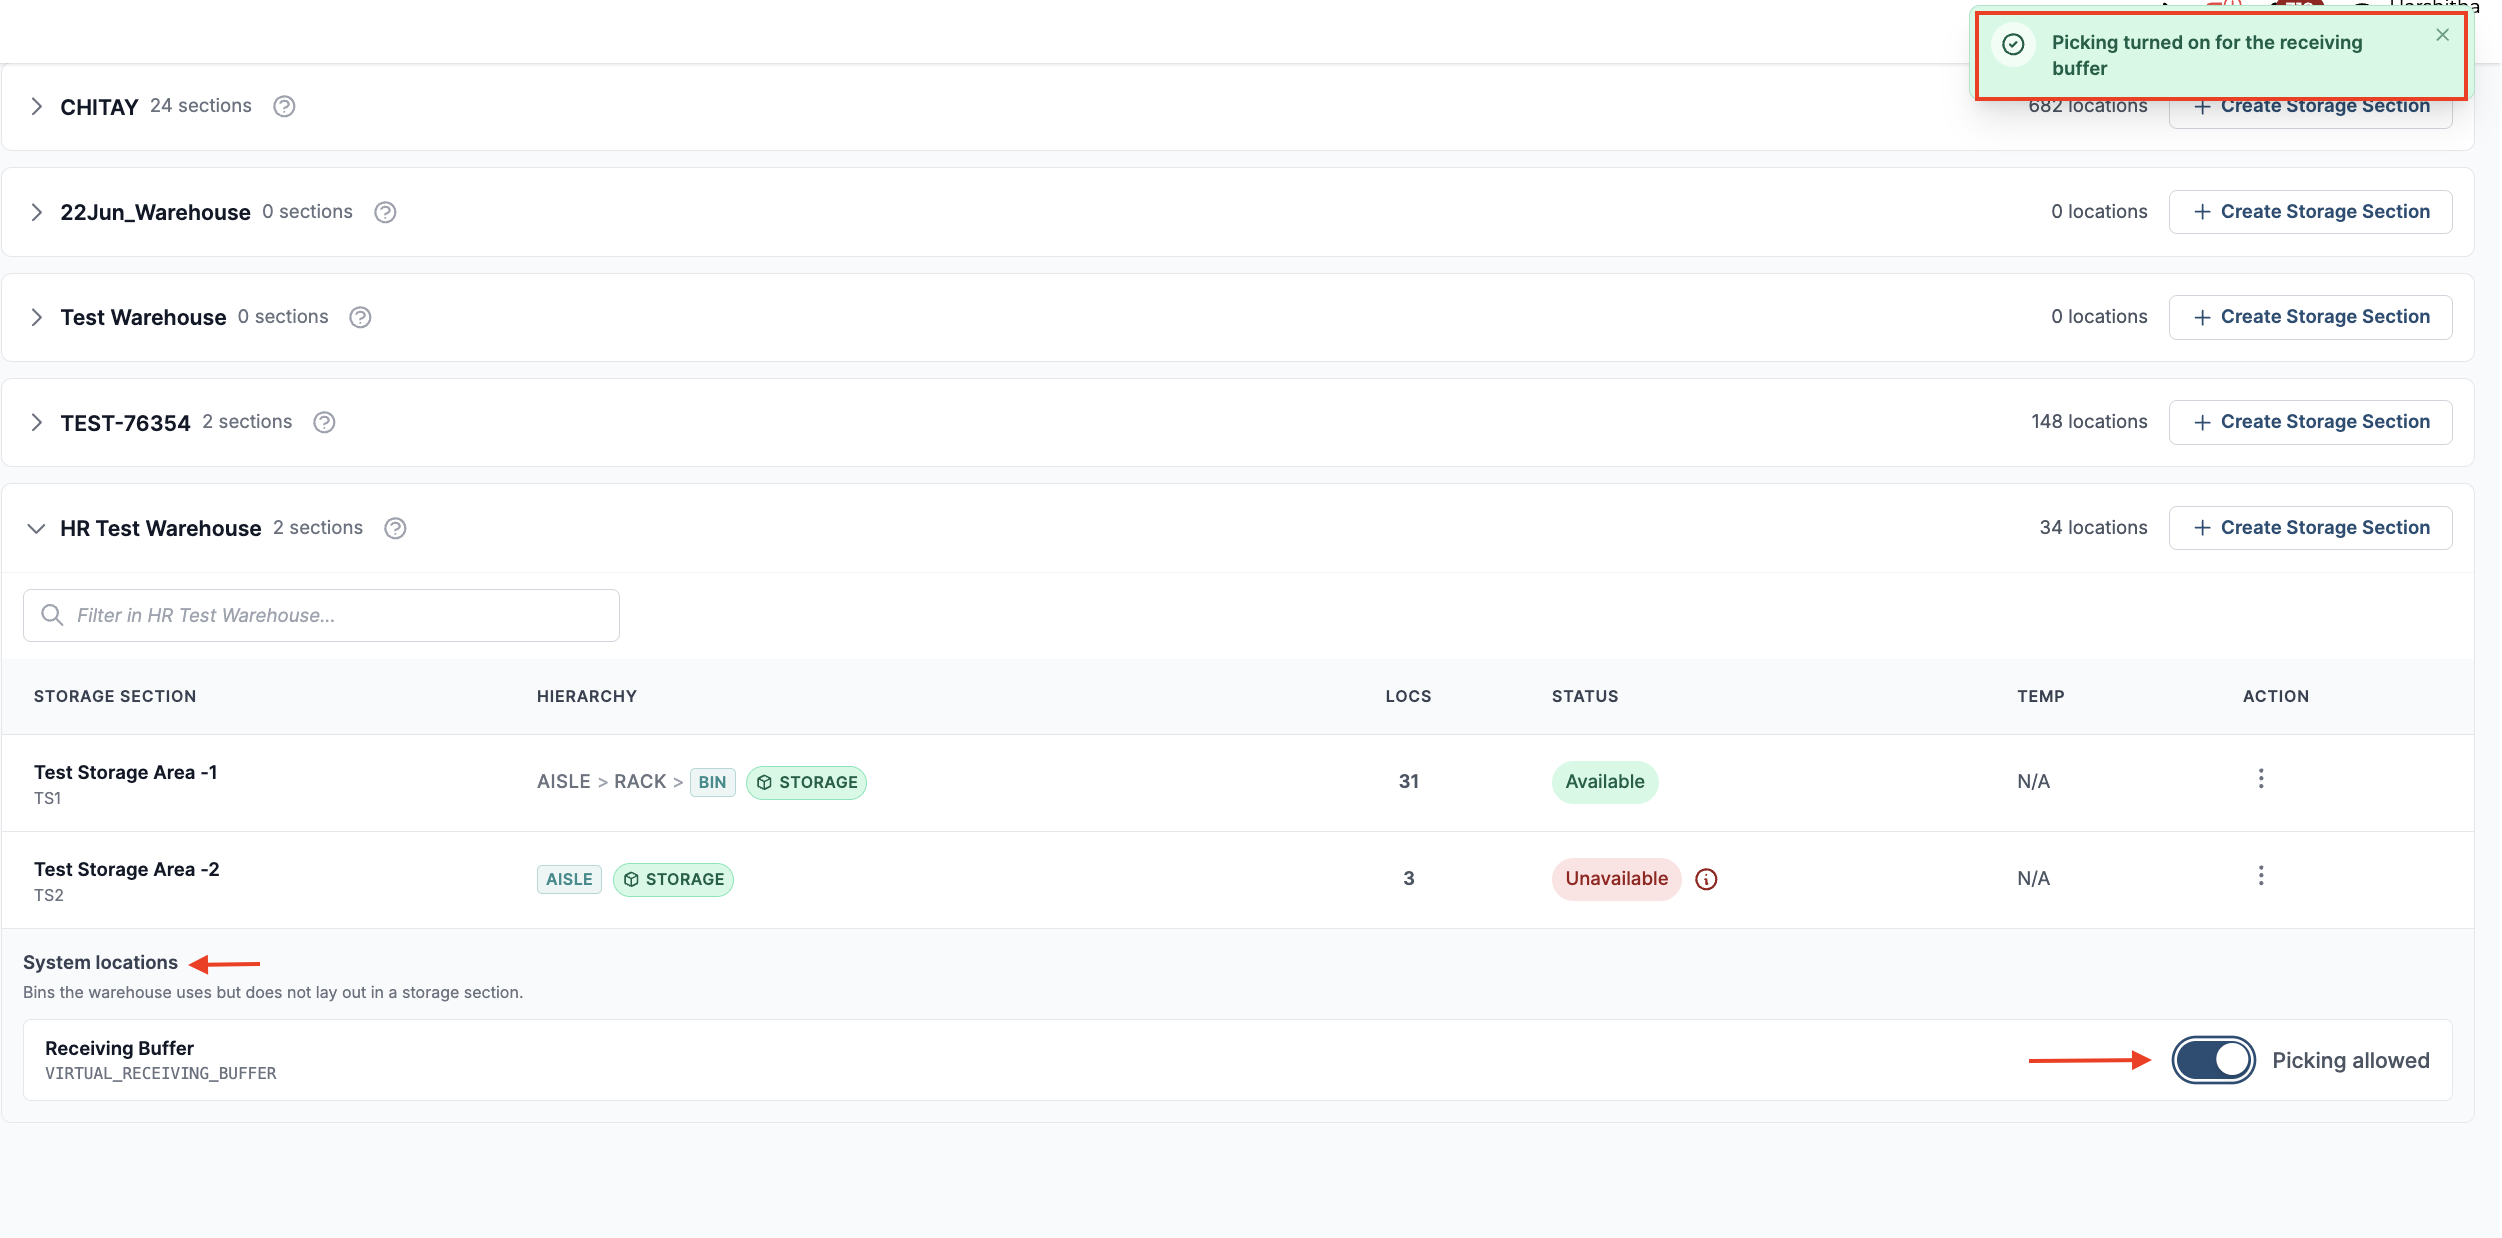
Under System locations, find the Receiving Buffer and turn on Picking allowed.
-
Hopstack confirms with the message "Picking turned on for the receiving buffer".
Note: If the Quality Check workflow is enabled for your account, Picking allowed cannot be turned on for the Receiving Buffer.
How orders are allocated from the Receiving Buffer:
-
Hopstack allocates stock from the Receiving Buffer only after stock in storage locations. This applies even when the stock in the Receiving Buffer expires sooner.
What the picker sees:
-
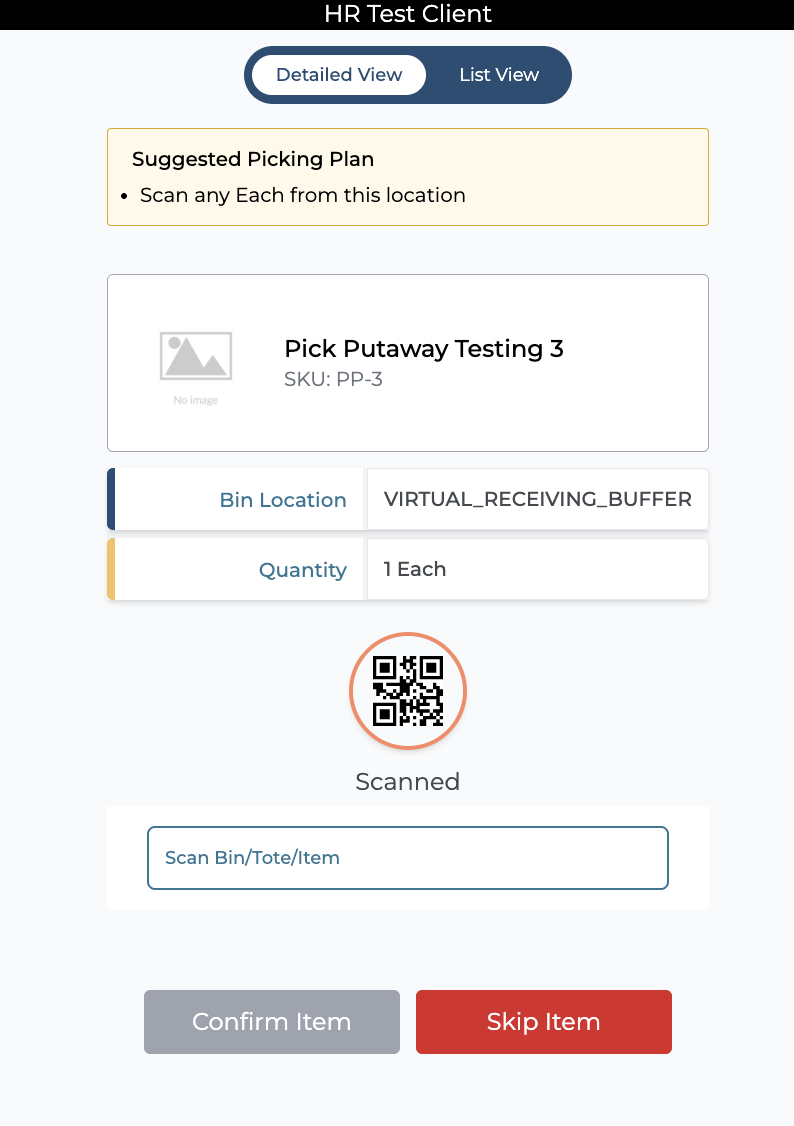
The picker is sent to the Receiving Buffer, whose location code is VIRTUAL_RECEIVING_BUFFER. The picker scans its barcode like any other location.
-
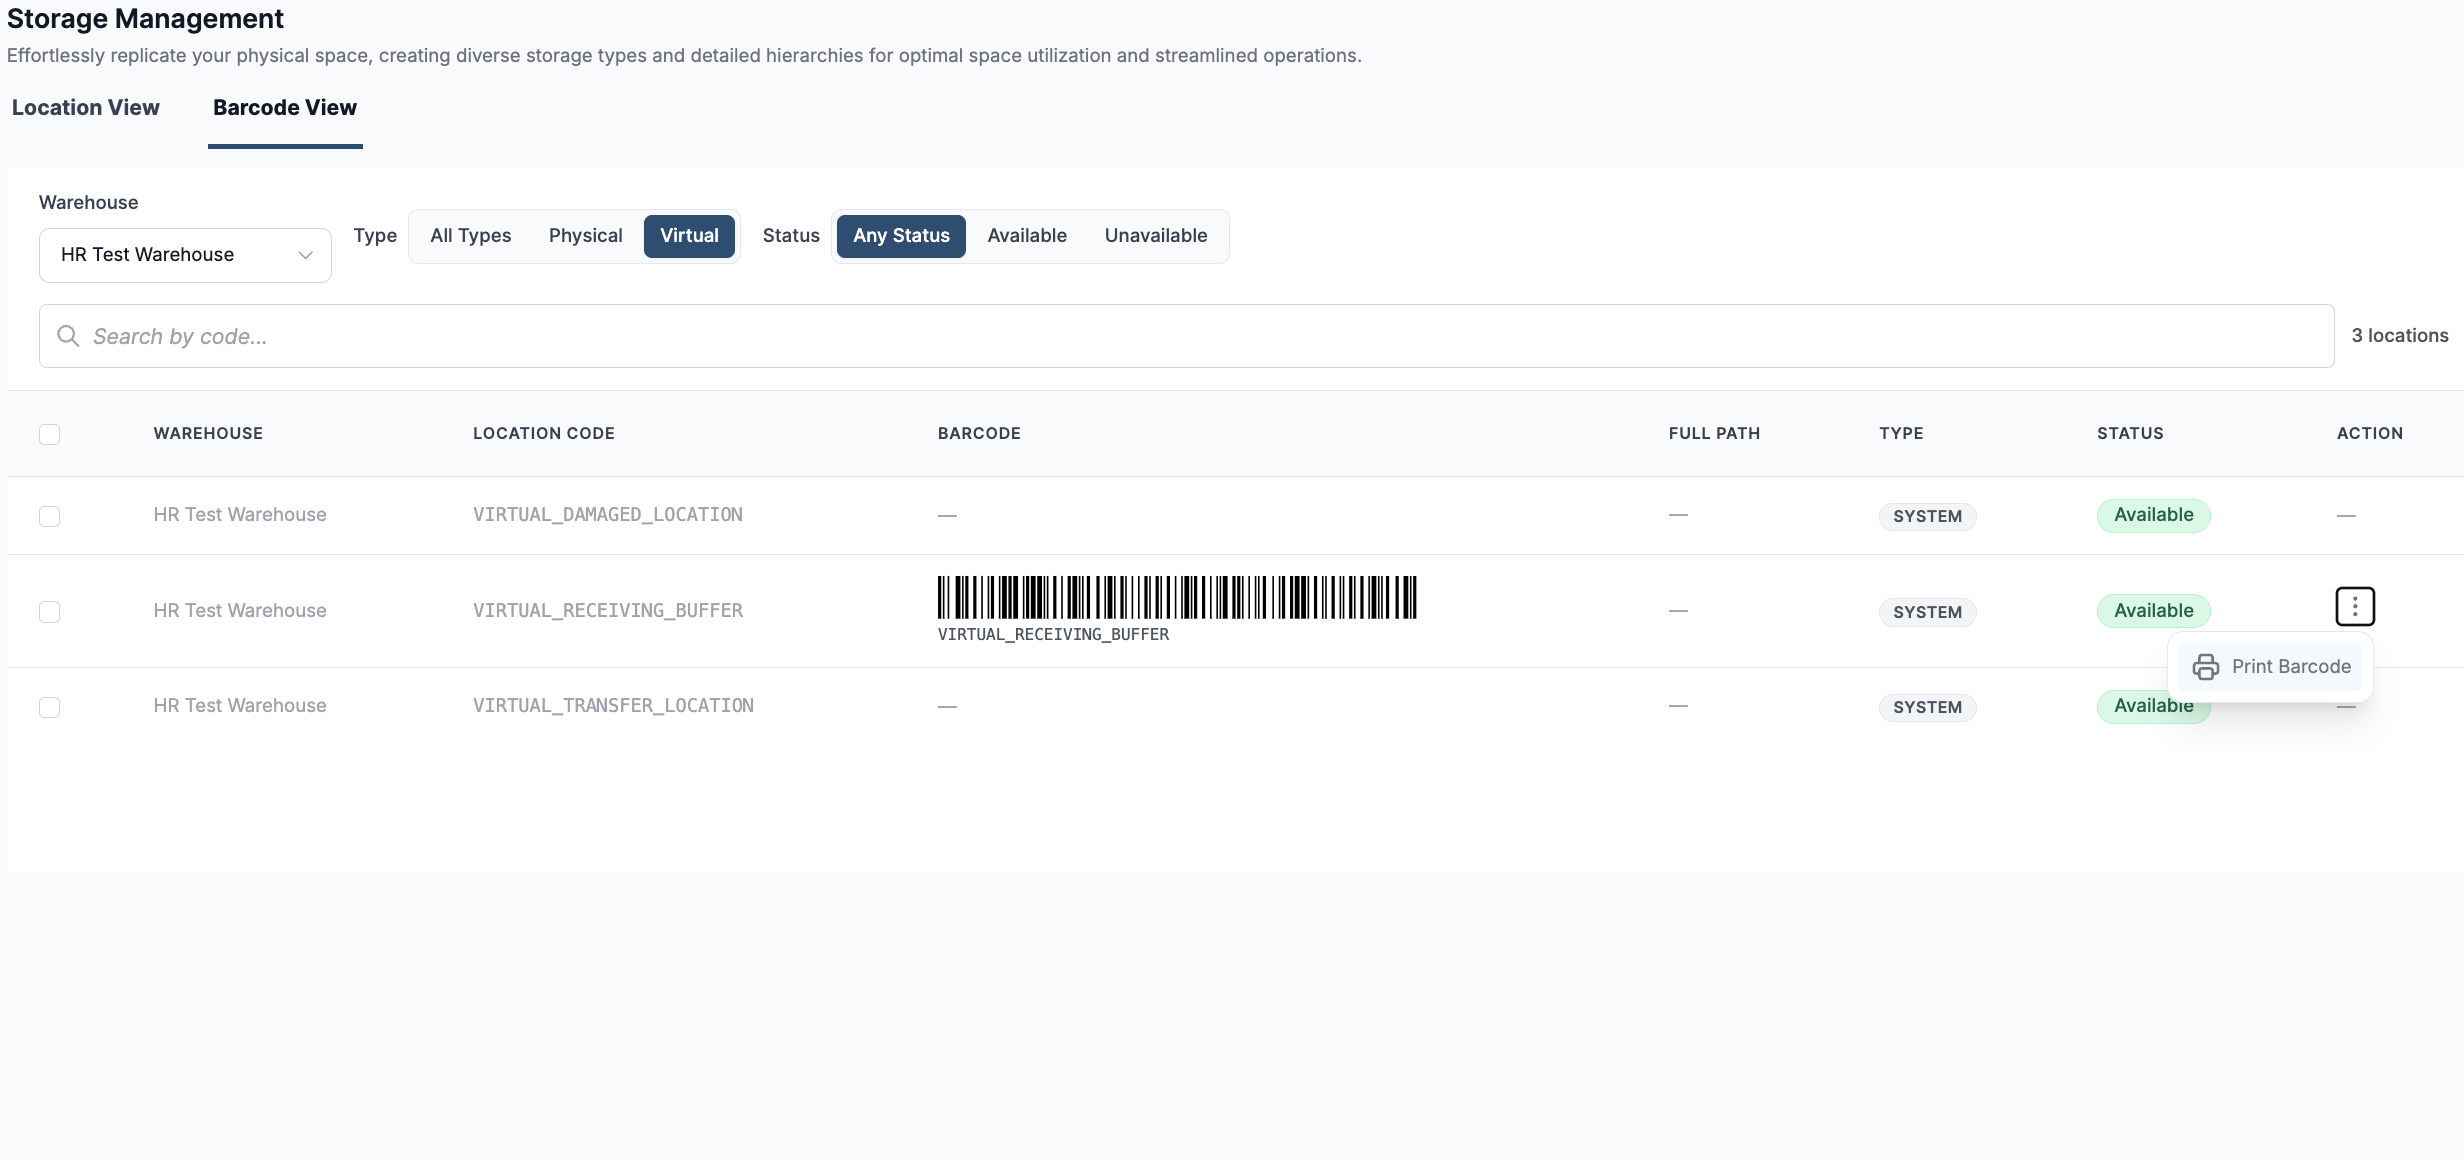
You can print the Receiving Buffer's barcode from the Barcode View tab in Storage Management.
-
Hopstack does not offer the picker a Bin-to-Bin Transfer while picking from the Receiving Buffer.
When stock is put away after an order has been allocated it:
Associates can put away stock even after receiving buffer has been allocated to an order. The order's allocation moves with the stock to the location it is put away into.
-
If the picker has not reached that item yet, the picker's screen shows the new location.
-
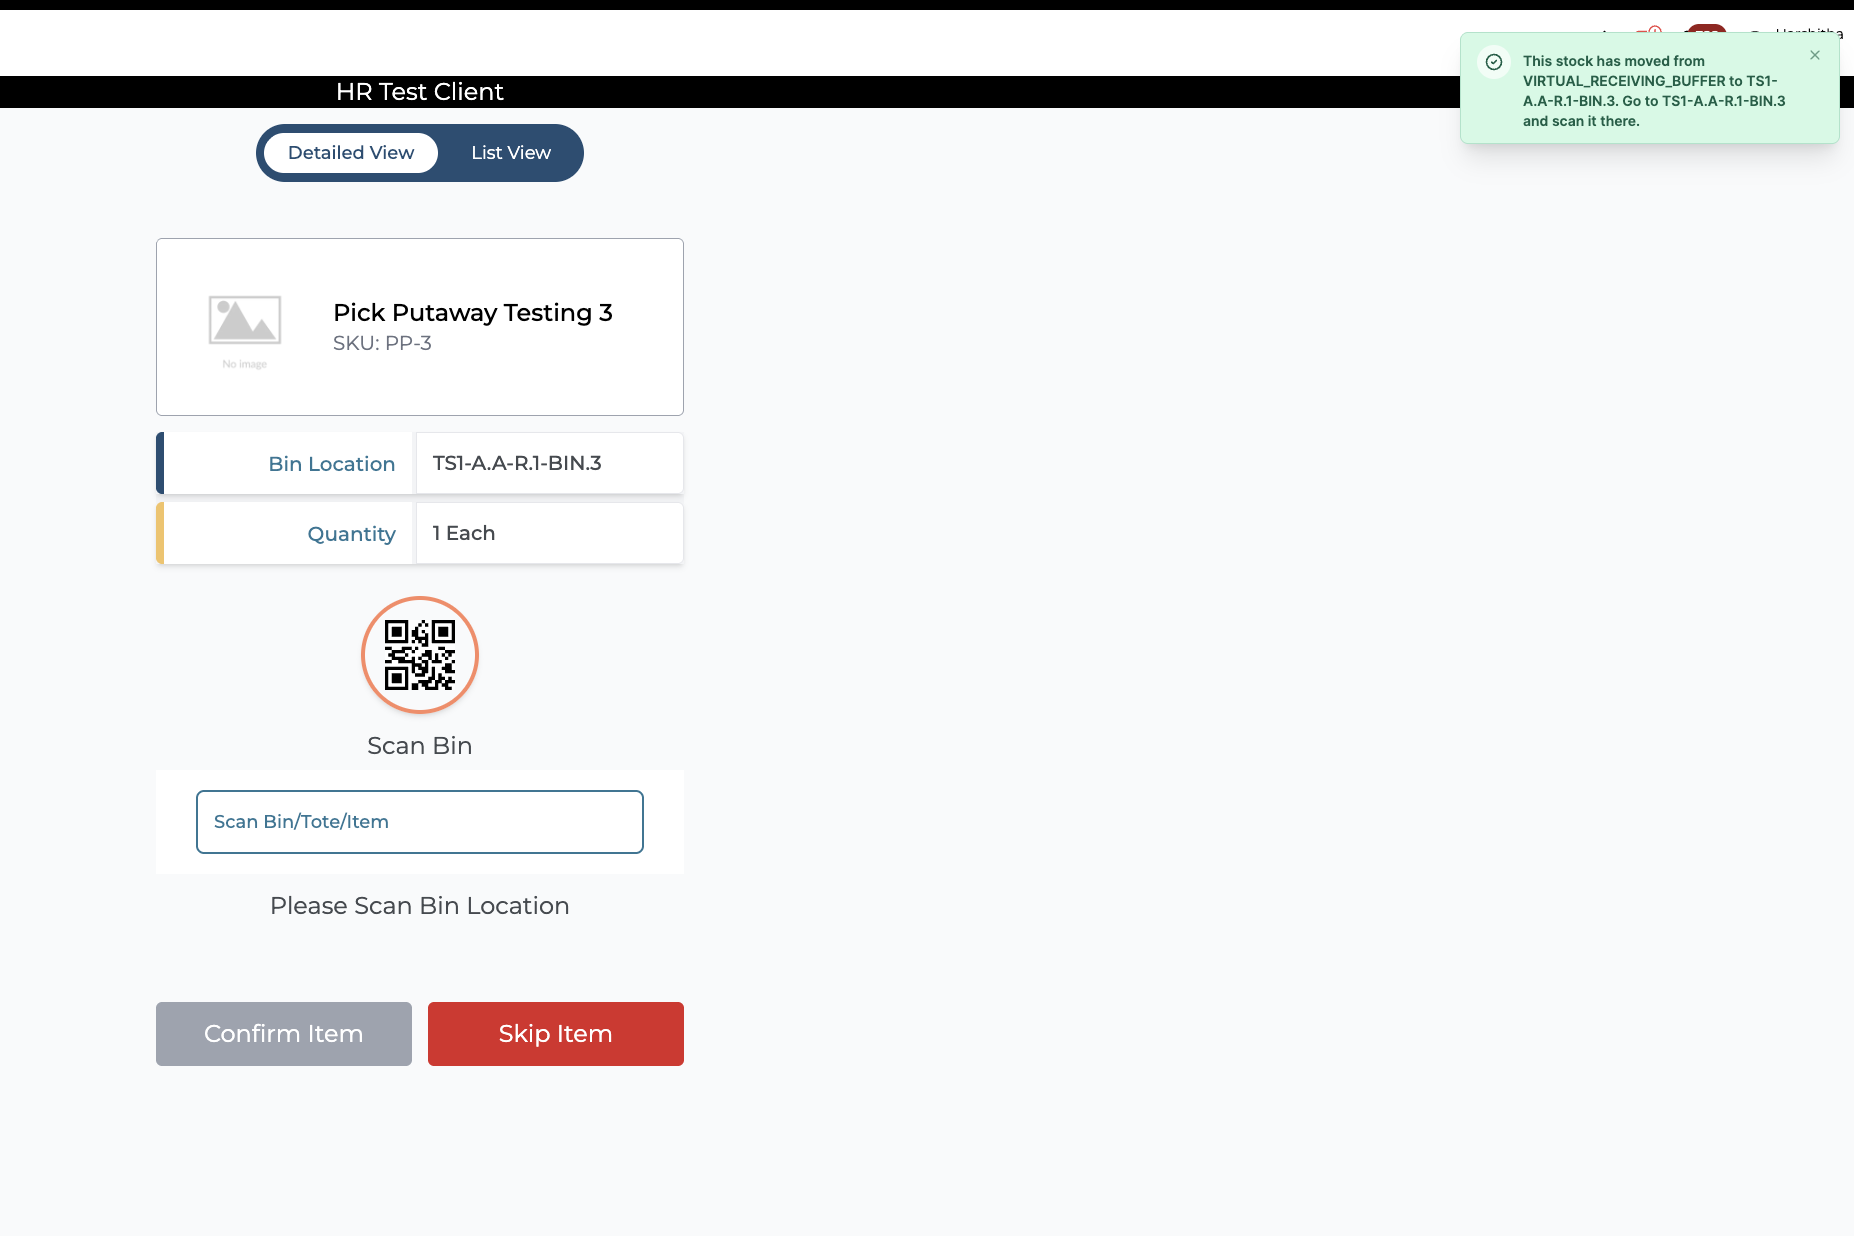
If the picker is already at the Receiving Buffer for that item, scanning shows a message. For example: "This stock has moved from VIRTUAL_RECEIVING_BUFFER to TS1-A.A-R.1-BIN.3. Go to TS1-A.A-R.1-BIN.3 and scan it there." The picker's screen then shows the new location.
Receipts that orders have used:
-
Putaway: Sometimes all units of a receipt have already been picked for an order from the Receiving Buffer. A putaway scan of that receipt then shows a message naming the order. For example: "The units of this receipt are picked for order 1001. There is nothing left to put away."
-
Undo receiving: A receipt cannot be undone while an order is allocated stock from it in the Receiving Buffer. Hopstack shows a message naming the order. For example: "This receipt cannot be undone: stock of it still in the receiving buffer is claimed by order 1001. Release the claim first."
How the settings work with Status and Reservations
-
Unavailable locations: An Unavailable location cannot be used for any operation, irrespective of its Putaway allowed and Picking allowed values. See Storage Management Status.
-
Available locations: Each setting affects only its own workflow. An Available location with Putaway allowed off can still be picked from. An Available location with Picking allowed off can still receive putaway.
-
Reservations: Reservations still apply. A location reserved for a different client or product cannot be used, irrespective of its Putaway allowed and Picking allowed values. See Storage Management Reservations.
-
Separate from Status: You change Status with Update Status and these two settings with Configure Attributes. Unlike Status, a change on a child location never changes its parent location.
Putaway Allowed and Picking Allowed in the Locations Occupancy Report
The Locations Occupancy Report includes two columns:
-
Putaway Allowed: Yes or No for each location.
-
Picking Allowed: Yes or No for each location.
A column is blank where the setting does not apply to the location.
Setting Putaway allowed and Picking allowed through the API
You can also view and change both settings through the Hopstack REST API. Use the List Locations and Update Location endpoints in the Locations section of the API Documentation.
For any questions or concerns, please reach out to the Hopstack Implementation team.